Introduction
Apple introduced their CloudKit framework alongside iOS 8 in 2014. While its main purpose was to act as an online database for iOS applications, CloudKit also offers many other features, including push notifications.
In this tutorial, I will be showing you how to use the CloudKit framework to implement push notifications for your iOS apps. If you want to learn more about the other features CloudKit has to offer, you can read my tutorial covering the basics of the framework:


This tutorial requires you to be using at least Xcode 8 with Swift 3. You will also need to have a physical iOS device to test with and an Apple developer account so that you can enable CloudKit for your application.
1. Why Use CloudKit?
First, we'll look at the advantages (and disadvantages) of using CloudKit for your app's push notifications.
As you will see in this tutorial, to set up push notifications with CloudKit, you don't need to worry about creating certificates and provisioning profiles as you do with other cloud services. Since everything is made by Apple, all you have to do is enable CloudKit for your app, and the rest just works.
One of the best things about CloudKit for some developers is how much you get for free. Many other Backend-as-a-Service (BaaS) companies exist and offer push notifications for iOS apps, but most of these have limits on how many notifications can be sent for free. With CloudKit, there is no limit on the number of push notifications you can send to your users. However, CloudKit's free tier does limit data storage, data transfer, and the number of user requests per second.
Another advantage of using CloudKit in your apps is that, being provided by Apple, network stability and maintenance will be something you will never have to worry about. Apple service outages occur very rarely and are fixed promptly. This means that you can rely on CloudKit to always be working properly for your users.
However, a disadvantage you should be aware of when using CloudKit is that it is not currently available on any non-Apple platforms. That means that if you want to create an Android version of your app, CloudKit won't work. For a cross-platform solution, I would recommend another BaaS such as back4app (built on Parse) as I discuss in this tutorial:

2. Setting Up CloudKit
To begin, create a new project in Xcode from the iOS > Application > Single View Application template.
Once Xcode has created your project, go to the Project navigator and click on the Capabilities tab. On this screen, click the switch to enable iCloud and then enable the CloudKit checkbox:


Once you have enabled CloudKit, you can now go to the CloudKit dashboard for your app.
To send push notifications to our app's users, we are going to create a GlobalNotification record type which will notify all users when a new record of this type is created. If the Record Type section of the CloudKit dashboard isn't open already for you after logging in, click on it in the sidebar.
To create a new record type, click on the + button at the top of the screen. Fill in the menu as shown in the following screenshot:


For this tutorial, we are only adding a single content field to the record type, but for your own applications, you can add as many as you need.
When you are done, click on the Save button in the bottom-right corner.
3. Setting Up App
Back in Xcode, open up your AppDelegate.swift file and add the following import statements at the top of your code:
1 |
import CloudKit |
2 |
import UserNotifications |
This code will just import the CloudKit and UserNotifications frameworks. We are going to use the UserNotifications to manage both notification permissions and incoming notifications. If you want to learn more about this framework, you can read my tutorial covering it here:


Next, edit your AppDelegate class definition to make it conform to the UNUserNotificationCenterDelegate protocol:
1 |
class AppDelegate: UIResponder, UIApplicationDelegate, UNUserNotificationCenterDelegate { |
2 |
...
|
3 |
}
|
Now we need to request permission to show notifications. To do so, replace your application(_:didFinishLaunchingWithOptions:) method with the following:
1 |
func application(_ application: UIApplication, didFinishLaunchingWithOptions launchOptions: [UIApplicationLaunchOptionsKey: Any]?) -> Bool { |
2 |
|
3 |
UNUserNotificationCenter.current().delegate = self |
4 |
UNUserNotificationCenter.current().requestAuthorization(options: [.alert, .badge, .sound], completionHandler: { authorized, error in |
5 |
if authorized { |
6 |
application.registerForRemoteNotifications() |
7 |
}
|
8 |
})
|
9 |
|
10 |
return true |
11 |
}
|
With this code, we ask the user for permission to show notifications and if they accept, register the app for push notifications.
Now, we need to implement the application(_:didRegisterForRemoteNotificationsWithDeviceToken:) method. Add the following code to your AppDelegate class:
1 |
func application(_ application: UIApplication, didRegisterForRemoteNotificationsWithDeviceToken deviceToken: Data) { |
2 |
let subscription = CKQuerySubscription(recordType: "GlobalNotification", predicate: NSPredicate(format: "TRUEPREDICATE"), options: .firesOnRecordCreation) |
3 |
|
4 |
let info = CKNotificationInfo() |
5 |
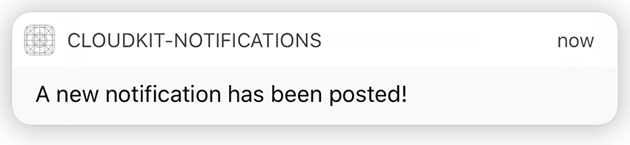
info.alertBody = "A new notification has been posted!" |
6 |
info.shouldBadge = true |
7 |
info.soundName = "default" |
8 |
|
9 |
subscription.notificationInfo = info |
10 |
|
11 |
CKContainer.default().publicCloudDatabase.save(subscription, completionHandler: { subscription, error in |
12 |
if error == nil { |
13 |
// Subscription saved successfully
|
14 |
} else { |
15 |
// An error occurred
|
16 |
}
|
17 |
})
|
18 |
}
|
With this code, we first create a CKQuerySubscription object. This subscription object is what tells CloudKit what it should send notifications for. When initialising this subscription, we include the following:
- The name of the record type to monitor.
- A predicate which can be used to limit the subscription to particular records of your specified type. In this tutorial, we want to subscribe to all GlobalNotification records so we pass in a predicate which is always true.
- One or more triggers telling CloudKit when a notification should be sent. In this example, we only want a notification when a new record is created. Other valid triggers include when a record is updated or deleted.
Next we create a CKNotificationInfo object, provide it with some content, and then assign it to the subscription object. The CKNotificationInfo object is how you format the push notification that is delivered to your users. In this example, we are configuring it with the following properties:
- An
alertBodyof"A new notification has been posted!" - A
shouldBadgevalue oftrue. This will cause the app icon on the home screen to increment its number for every notification that comes in. - A
soundNameof"default". This will just use the default iOS notification sound for your app. If you want to use a custom sound, then you will need to use the name of your sound file. - A
desiredKeysarray with a single value. For every key you include in this array, CloudKit will load the corresponding value from the record that triggered the notification and include it in the notification's user information dictionary.
Further down, we assign the notification info to the subscription, which is then saved to the public CloudKit database for your app.
So that you can see the notification while your app is running, add the following method to your AppDelegate class:
1 |
func userNotificationCenter(_ center: UNUserNotificationCenter, willPresent notification: UNNotification, withCompletionHandler completionHandler: @escaping (UNNotificationPresentationOptions) -> Void) { |
2 |
completionHandler([.alert, .sound]) |
3 |
}
|
This code uses the UserNotifications framework to show your notification as if your app wasn't running at all.
Before running your app, you will need to check if your test device is logged into an iCloud account by going to Settings. If not, you will need to do so because the CloudKit APIs require the current user to be logged in.
Build and run your app from Xcode and accept your app's request to show notifications. Once you have done that, go back to the CloudKit dashboard for your app and click on Subscription Types in the left sidebar. You should see a new subscription for GlobalNotification records with an INSERT trigger:


4. Sending a Notification
Now, all that's left for us to do is to send a notification! Still in the CloudKit dashboard, click on Default Zone under Public Data in the left sidebar. Click either on the + button or on New Record to create a new GlobalNotification record. Fill in the content with whatever you want and click Save in the bottom right corner.
Once your record has been saved, you should see the notification appear straight away on your test device:


Conclusion
As you've seen, you can easily implement push notifications for your iOS app using CloudKit. The setup is very simple, with only a small number of steps, and the provided APIs allow for any push notifications you may need for your apps.
As always, please be sure to leave your comments and feedback in the comments section below. And do check out some of our other iOS courses and tutorials!