Introduction
This tutorial will show you how to write web service tests with the Karate framework. We will start with a short introduction about the basic features, then we will explore the domain-specific language (DSL), and learn how to apply it to verify a web service’s response and the returned JSON structures.
As integration with existing frameworks is important, we will demonstrate how to integrate well-known tools like JUnit and Maven to execute our tests and generate reports that may be used for integration-servers/services.
This tutorial will also cover other interesting aspects of this framework like configuration files, data tables, switching HTTP client implementations or more complex use cases like testing multipart file uploads.
Finally, we will show you how easy it is to set up a Continuous Integration (CI) on Semaphore for Karate tests in a few seconds.
Prerequisites
We assume that you possess general knowledge of the HTTP protocol, the JSON notation, basic Java knowledge and experience in using build tools like Maven.
To integrate Karate in our project using Maven as a build tool, we only need to add the following two dependencies to pom.xml:
<dependencies>
    <dependency>
        <groupId>com.intuit.karate</groupId>
        <artifactId>karate-apache</artifactId>
        <version>0.9.5</version>
        <scope>test</scope>
    </dependency>

    <dependency>
        <groupId>com.intuit.karate</groupId>
        <artifactId>karate-junit5</artifactId>
        <version>0.9.5</version>
        <scope>test</scope>
    </dependency>
</dependencies>
We also have to add the surefire-plugin to the plugin section in pom.xml:
<build>
    <plugins>
        <plugin>
            <groupId>org.apache.maven.plugins</groupId>
            <artifactId>maven-surefire-plugin</artifactId>
            <version>2.22.2</version>
        </plugin>
    </plugins>
</build>
About Karate
Karate is a web service testing framework build on top of the popular Cucumber library. It eases the testing process allowing developers without Java knowledge to script sequences of HTTP calls and specify expectations for the web services response easy and fast, offering a custom domain-specific language.
Features of Karate
In addition to the features mention above, the Karate library offers a variety of additional features:
- Cucumber based, Gherkin syntax supported — IDE support and syntax-highlighting are supported,
- ‘Native’ JSON and XML support including JsonPath and XPath expressions,
- Re-usable scripts and feature files that may be called from other scripts and feature files,
- Embedded JavaScript engine that allows writing reusable functions in Javascript,
- Re-use of payload-data and user-defined functions across tests,
- Configuration switching/staging support,
- Multi-threaded parallel execution support,
- Ability to invoke Java classes from a test,
- Select between Apache and Jersey HTTP client to avoid conflicts with existing dependencies, and
- Simple latency assertions may be used to validate non-functional requirements in respect of performance requirements.
Many other features are listed on the GitHub project.
Implementing Karate Tests
We’re now ready to write our first tests. Tests consist of a Java class that might be recognized by the designated test framework used and a feature file that describes our interaction with the service under test.
Directory Structure
Karate tests scripts use the *.feature extension. The naming convention recommends putting the features next to the *.java files. We can configure Maven to follow the recommended convention by editing pom.xml:
<build>
    <testResources>
        <testResource>
            <directory>src/test/java</directory>
            <excludes>
                <exclude>**/*.java</exclude>
            </excludes>
        </testResource>
    </testResources>
</build>
On the final account, the naming convention follows this pattern:
src
└── test
    └── java
        └── animals
            ├── AnimalsTest.java
            ├── cats
            |   ├── cats-post.feature
            |   ├── cats-get.feature
            |   ├── cat.json
            |   └── CatsRunner.java
            └── dogs
                |
                ├── dog-crud.feature
                ├── dog.json
                ├── some-helper-function.js
                └── DogsRunner.java
Feature Files
Karate features are written in a DSL that we’ll be covering in the following examples.
Our features are generally stored in src/test/java/ so that feature files and Java tests are matched by their name and package structure.
JUnit Integration
All we need to do to integrate JUnit is to create a test class addressing our corresponding JUnit runner so that a minimal approach could look like the following class.
package karate;

import com.intuit.karate.junit5.Karate;

class SampleTest {

    @Karate.Test
    Karate testSample() {
        return Karate.run("sample").relativeTo(getClass());
    }

    @Karate.Test
    Karate testTags() {
        return Karate.run("tags").tags("@second").relativeTo(getClass());
    }

    @Karate.Test
    Karate testFullPath() {
        return Karate.run("classpath:karate/tags.feature").tags("@first");
    }

}
If we need to set up instrumentation for our tests, we can use JUnit‘s lifecycle mechanisms like @Before, @BeforeClass, @After, @AfterClass, test rules and so on.
Simple Hello World Example
We’re now ready to start with a simple example.
Assuming that we’ve got a simple RESTful web service running on localhost (e.g. http://localhost:3000/quote) that returns a random quote when called in a GET request.
The response is returned using the JSON format and looks like this one:
{
"quote":"Hello world, use Karate! :)"
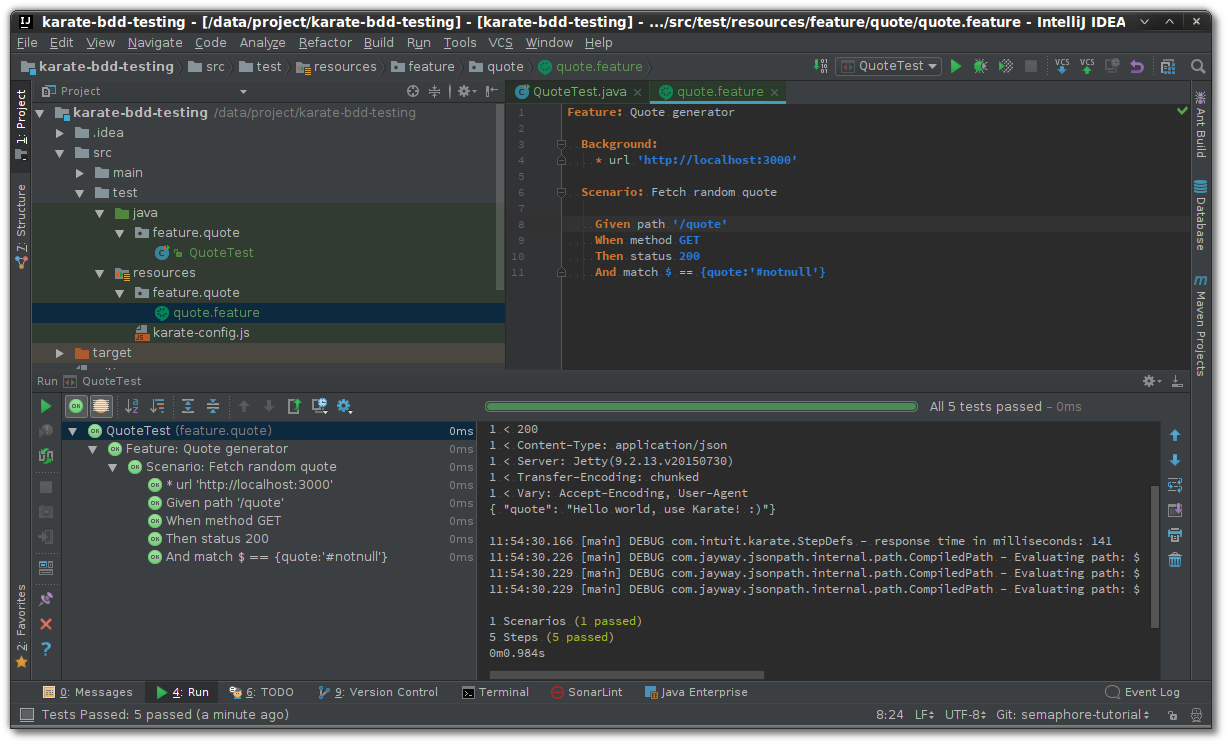
}We’re starting by writing our expectation in a new feature file named quote.feature saved in src/test/java/feature/quote.
In this feature file, we’re defining a new feature named “Quote generator”, and setting a global setting for our base URL.
Afterward, we’re adding one scenario for fetching random quotes and assure that the response status code is 200 and that the quote in the response’s JSON structure is not null using a special marker.
The following markers are currently supported:
- #ignore Ignores the field.
- #null Value must be null.
- #notnull Value must not be null.
- #array Value must be JSON array.
- #object Value must be a JSON object.
- #boolean Value must be true or false.
- #number Value must be a number.
- #string Value must be a string.
- #uuid Value must match the UUID format.
- #regex Value matches a regular expression.
- #? EX Javascript expression EX must evaluate to true.
More detailed information about the rich syntax of Karate’s DSL can be found in the project’s wiki.
Feature: Quote generator

    Background:
        * url 'http://localhost:3000'

    Scenario: Fetch random quote

        Given path 'quote'
        When method GET
        Then status 200
        And match $ == {quote:'#notnull'}
In the next step, we’re adding a Java class so that JUnit‘s test-runner executes our test.
Following the naming conventions, we’re creating the following class named QuoteRunner in src/test/java/feature/quote:
package feature.quote;

import com.intuit.karate.junit5.Karate;

class QuoteRunner {
    @Karate.Test
    Karate testQuotes() {
        return Karate.run("quotes").relativeTo(getClass());
    }
}
We may now run our test using Maven in the command line as follows:
$ mvn test

------------------------------------------------------- T E S T S -------------------------------------------------------
Running feature.quote.QuoteRunner
11:56:31.648 [main] DEBUG com.intuit.karate.cucumber.CucumberRunner - init test class: class feature.quote.QuoteTest
11:56:31.756 [main] DEBUG com.intuit.karate.cucumber.CucumberRunner - loading feature: /data/project/karate-bdd-testing/target/test-classes/feature/quote/quote.feature
[..]
1 > GET http://localhost:3000/quote
[..]
1 < 200
1 < Content-Type: application/json
1 < Server: Jetty(9.2.13.v20150730)
1 < Transfer-Encoding: chunked
1 < Vary: Accept-Encoding, User-Agent
{ "quote": "Hello world, use Karate! :)"}
[..] 1 Scenarios (1 passed) 5 Steps (5 passed)
0m0.866s
Tests run: 6, Failures: 0, Errors: 0, Skipped: 0, Time elapsed: 1.874 sec

Results :

Tests run: 6, Failures: 0, Errors: 0, Skipped: 0
Or alternatively using our IDE of choice:
Data Tables Example
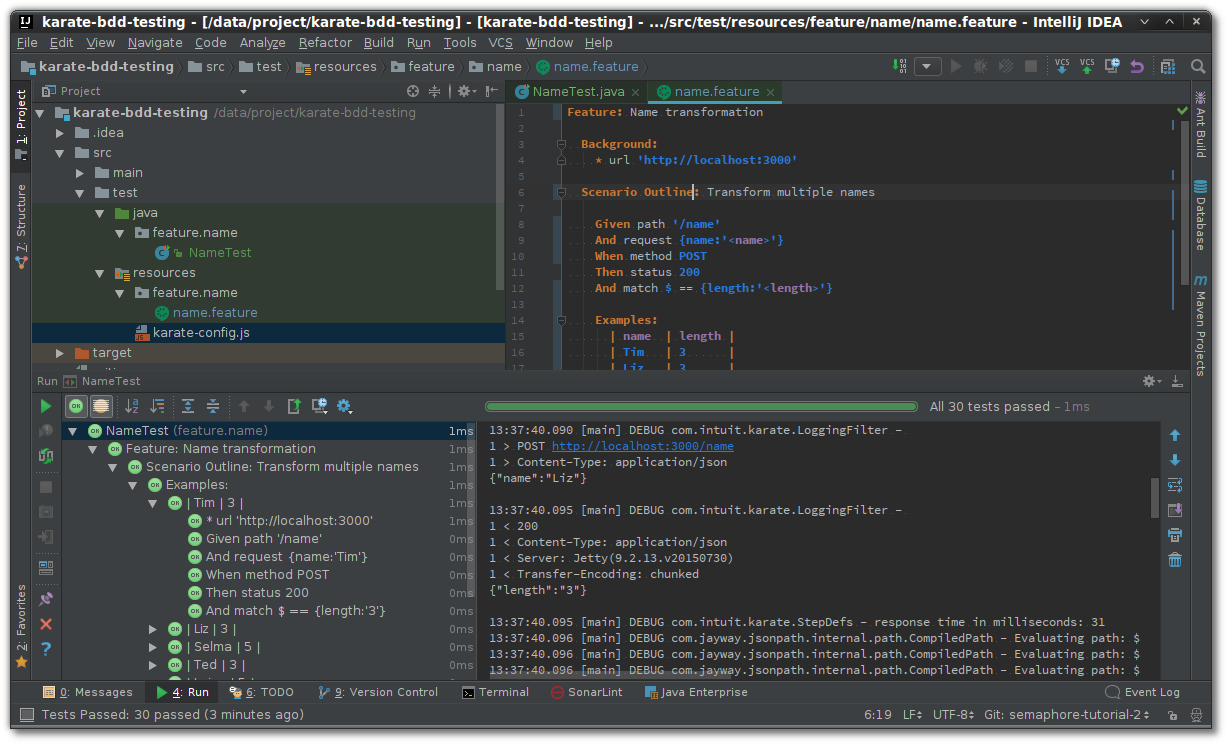
Data tables allow us to add datasets in a tabular form as examples for our tests, and also use this information to fill our tests and assertions.
Feature: Name transformation

  Background:
    * url 'http://localhost:3000'

  Scenario Outline: Transform multiple names

    Given path '/name'
    And request {name:'<name>'}
    When method POST
    Then status 200
    And match $ == {length:'<length>'}

    Examples:
      | name  | length |
      | Tim   | 3      |
      | Liz   | 3      |
      | Selma | 5      |
      | Ted   | 3      |
      | Luise | 5      |
Again, we can run these tests using Maven in the command line like this:
$ mvn test

-------------------------------------------------------
  T E S T S
-------------------------------------------------------
Running feature.name.NameTest
13:43:23.567 [main] DEBUG com.intuit.karate.cucumber.CucumberRunner - init test class: class feature.name.NameTest
13:43:23.688 [main] DEBUG com.intuit.karate.cucumber.CucumberRunner - loading feature: /data/project/karate-bdd-testing/target/test-classes/feature/name/name.feature
[..]
1 > POST http://localhost:3000/name
1 > Content-Type: application/json
{"name":"Tim"}
[..]
1 < 200 1 < Content-Type: application/json
1 < Server: Jetty(9.2.13.v20150730)
1 < Transfer-Encoding: chunked
{"length":"3"}
[..]
5 Scenarios (5 passed)
30 Steps (30 passed)
0m1.288s

Tests run: 35, Failures: 0, Errors: 0, Skipped: 0, Time elapsed: 2.334 sec

Results :

Tests run: 35, Failures: 0, Errors: 0, Skipped: 0
Or alternatively using our IDE of choice:
Complex Example
To demonstrate Karate’s capabilities when dealing with file uploads and Multipart requests, we’re going to write tests for a RESTful web service for file management.
This service allows us to upload files that are stored in a temporary directory, and also to list all stored files.
Throughout its APIs, the JSON format is used for the server’s response messages.
For demonstration purposes, we have hacked together a quick and ugly implementation using Spring Boot.
File Store Service
This is our simple file store application written with Spring Boot:
package com.hascode.tutorial;

// imports ..

@SpringBootApplication
public class Application {

  public static void main(String[] args) {
    SpringApplication.run(Application.class, args);
  }
}
This is our RESTful web service implementation:
package com.hascode.tutorial;

// imports ..

@Controller
public class FileUploadController {

  // setup, temp-dir etc ..

  @GetMapping("/")
  @ResponseBody
  public ResponseEntity<List<FileDto>> listFiles() {

    return ResponseEntity
        .ok()
        .contentType(MediaType.APPLICATION_JSON)
        .body(Arrays.stream(store.listFiles()).map(FileDto::of).collect(Collectors.toList()));
  }

  @PostMapping("/")
  @ResponseBody
  public ResponseEntity<Map<String, Object>> uploadFile(@RequestParam("file") MultipartFile file)
      throws IOException {
    // store file

    Map<String, Object> response = new HashMap<>();
    response.put("error", false);
    response.put("bytesUploaded", file.getBytes().length);

    return ResponseEntity
        .ok().contentType(MediaType.APPLICATION_JSON).body(response);
  }

  @ExceptionHandler(FileNotFoundException.class)
  public ResponseEntity handleStorageFileNotFound(FileNotFoundException e) {
    return ResponseEntity.notFound().build();
  }

  // simple DTO
  private static class FileDto {

    private final String name;
    private final long sizeInBytes;

    private FileDto(String name, long sizeInBytes) {
      this.name = name;
      this.sizeInBytes = sizeInBytes;
    }

    public static FileDto of(File file) {
      return new FileDto(file.getName(), file.length());
    }

    public String getName() {
      return name;
    }

    public long getSizeInBytes() {
      return sizeInBytes;
    }
  }
}
Starting the RESTful Web Service
We may run our service now using our IDE of choice or by using Maven in the command line as follows:
$ mvn spring-boot:run

  .   ____          _            __ _ _
 /\\ / ___'_ __ _ _(_)_ __  __ _ \ \ \ \
( ( )\___ | '_ | '_| | '_ \/ _` | \ \ \ \
 \\/  ___)| |_)| | | | | || (_| |  ) ) ) )
  '  |____| .__|_| |_|_| |_\__, | / / / /
 =========|_|==============|___/=/_/_/_/
 :: Spring Boot ::        (v2.2.4.RELEASE)

2020-03-23 12:11:44.646  INFO 26684 --- [           main] o.s.b.w.embedded.tomcat.TomcatWebServer  : Tomcat initialized with port(s): 8080 (http)
2020-03-23 12:11:44.675  INFO 26684 --- [           main] o.apache.catalina.core.StandardService   : Starting service [Tomcat]
2020-03-23 12:11:44.675  INFO 26684 --- [           main] org.apache.catalina.core.StandardEngine  : Starting Servlet engine: [Apache Tomcat/9.0.30]
2020-03-23 12:11:44.809  INFO 26684 --- [           main] o.a.c.c.C.[Tomcat].[localhost].[/]       : Initializing Spring embedded WebApplicationContext
2020-03-23 12:11:44.809  INFO 26684 --- [           main] o.s.web.context.ContextLoader            : Root WebApplicationContext: initialization completed in 1479 ms
2020-03-23 12:11:45.042  INFO 26684 --- [           main] o.s.s.concurrent.ThreadPoolTaskExecutor  : Initializing ExecutorService 'applicationTaskExecutor'
2020-03-23 12:11:45.208  WARN 26684 --- [           main] ion$DefaultTemplateResolverConfiguration : Cannot find template location: classpath:/templates/ (please add some templates or check your Thymeleaf configuration)
2020-03-23 12:11:45.792  INFO 26684 --- [           main] s.w.s.m.m.a.RequestMappingHandlerMapping : Mapped "{[/],methods=[POST]}" onto public org.springframework.http.ResponseEntity<java.util.Map<java.lang.String, java.lang.Object>> com.hascode.tutorial.FileUploadController.uploadFile(org.springframework.web.multipart.MultipartFile) throws java.io.IOException
2020-03-23 12:11:45.793  INFO 26684 --- [           main] s.w.s.m.m.a.RequestMappingHandlerMapping : Mapped "{[/],methods=[GET]}" onto public org.springframework.http.ResponseEntity<java.util.List<com.hascode.tutorial.FileUploadController$FileDto>>
2020-03-23 12:11:46.314  INFO 26684 --- [           main] o.s.b.w.embedded.tomcat.TomcatWebServer  : Tomcat started on port(s): 8080 (http) with context path ''
Accessing the Service
We are now ready to access our RESTful web service and practice some Karate with it.
First, let’s have a short introduction of the APIs exposed and how to access them using regular tools like curl or Postman.
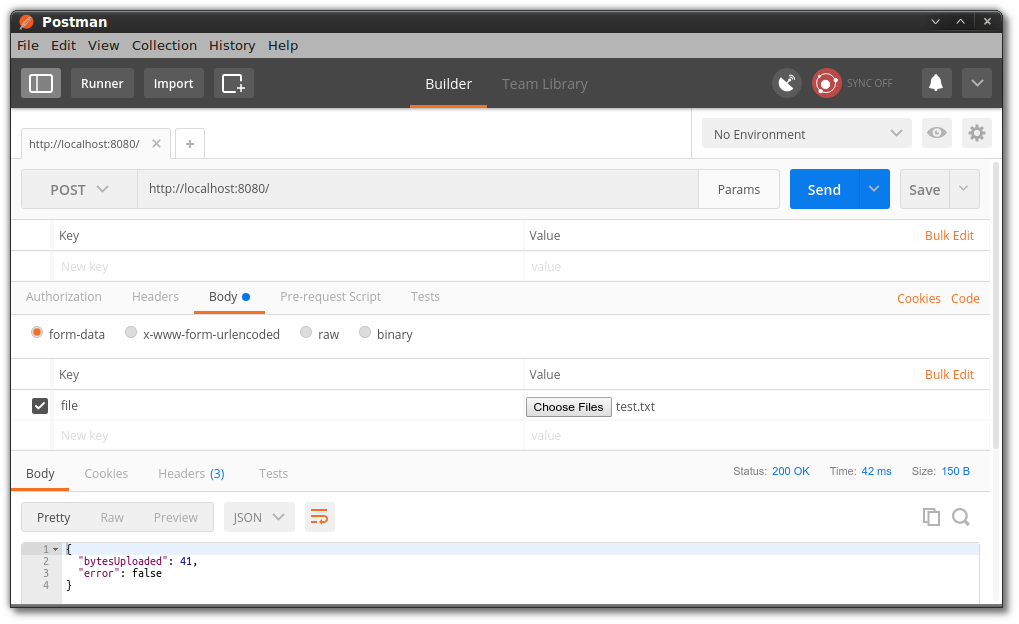
Storing a New File
We may upload files to the service that are stored in a temporary directory.
In the following examples, we’re uploading sample PDF files to our web service.
Uploading a file with Curl:
$ curl -vi -XPOST -F file=@test.pdf http://localhost:8080/Uploading a file with Postman:
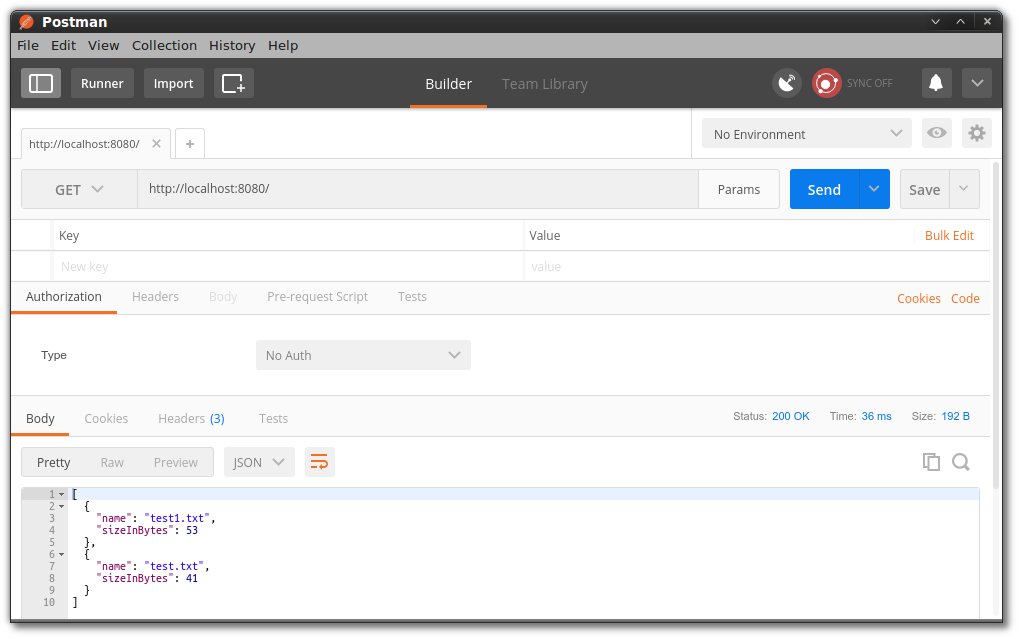
Listing Stored Files
The second API allows us to list stored files and receive a JSON response containing the file’s names and size (in bytes).
List stored files with Curl:
$ curl -vi -XGET http://localhost:8080/Response:
Assuming that we have uploaded two files named test.txt and test1.txt the following JSON structure is returned.
 [
   {
     "name": "test1.txt",
     "sizeInBytes": 53
   },
   {
     "name": "test.txt",
     "sizeInBytes": 41
   }
 ]
List stored files with Postman:
Karate Test for the File Service
To demonstrate how easy it is to test file-uploads and/or file-multipart requests, we’re going to write a quick test for the file server above.
Test Configuration
In the first step, we’re using a separate configuration file to load the base URL from a file and support staging.
For this purpose, we’re adding a file named karate-config.js to the directory src/test/java/feature:
function fn() {
    var config = {
        baseUrl : 'http://localhost:8080'
    };
    return config;
}
From now on, we’re referencing our base URL in our feature-files like this:
Background:
    * url baseUrl
Feature File
This is our feature file that describes how we’re interacting with our web service’s upload and file-listing functions.
Feature: Uploading a file

    Background:
        * url baseUrl

    Scenario: Upload file

        Given path '/'
        And multipart field file = read('test.pdf')
        And multipart field name = 'test.pdf'
        When method POST
        Then status 200
        And match $ == {error: false, bytesUploaded:'#notnull'}

        Given path '/'
        And multipart field file = read('test1.pdf')
        And multipart field name = 'test1.pdf'
        When method POST
        Then status 200
        And match $ == {error: false, bytesUploaded:'#notnull'}


    Scenario: List uploaded files

        Given path '/'
        When method GET
        Then status 200
        And match $.length() == 2
Directory Structure
Our test directory structure should now look similar to this one:
src/test
  └── java
      ├── feature
      │   └── file
      │       ├── FileRunner.java
      │       ├── file.feature
      │       ├── test1.pdf
      │       └── test.pdf
      └── karate-config.js
Running the Test
We may run our tests again using Maven in the command line or using our IDE of choice.
-------------------------------------------------------
 T E S T S
-------------------------------------------------------
Running feature.file.FileTest
[..]

1 > POST http://127.0.0.1:45074/
1 > Accept-Encoding: gzip,deflate
1 > Connection: Keep-Alive
1 > Content-Type: multipart/form-data; boundary=fgmmzFn4TdUJNb-aFXVLkGTwHY9GCma2fZ
1 > Host: 127.0.0.1:45074
1 > Transfer-Encoding: chunked
1 > User-Agent: Apache-HttpClient/4.5.11 (Java/13.0.2)
17:05:47.105 [main] DEBUG com.intuit.karate -
1 < 200
1 < Content-Type: application/json
1 < Date: Mon, 23 Mar 2020 12:27:47 GMT
1 < Transfer-Encoding: chunked
{"bytesUploaded":6514,"error":false}

[..]

2 > POST http://127.0.0.1:45074/
2 > Accept-Encoding: gzip,deflate
2 > Connection: Keep-Alive
2 > Content-Type: multipart/form-data; boundary=YqMIBXLu-C1HQkMo0AuggtF2vcd3-XuWRJ
2 > Host: 127.0.0.1:45074
2 > Transfer-Encoding: chunked
2 > User-Agent: Apache-HttpClient/4.5.11 (Java/13.0.2)

[..]

2 < 200
2 < Content-Type: application/json
2 < Date: Mon, 23 Mar 2020 12:27:47 GMT
2 < Transfer-Encoding: chunked
{"bytesUploaded":6514,"error":false}

[..]

1 > GET http://127.0.0.1:45074/
1 > Accept-Encoding: gzip,deflate
1 > Connection: Keep-Alive
1 > Host: 127.0.0.1:45074
1 > User-Agent: Apache-HttpClient/4.5.11 (Java/13.0.2)

[..]

1 < 200
1 < Content-Type: application/json
1 < Date: Mon, 23 Mar 2020 12:27:47 GMT
1 < Transfer-Encoding: chunked
[{"name":"test.pdf","sizeInBytes":6514},{"name":"test1.pdf","sizeInBytes":6514}]

[..]

2 Scenarios (2 passed)
18 Steps (18 passed)
0m1.106s
Tests run: 20, Failures: 0, Errors: 0, Skipped: 0, Time elapsed: 3.585 sec

Results :

Tests run: 20, Failures: 0, Errors: 0, Skipped: 0
The Karate demo section offers a test-setup using an embedded Spring Boot instance, too as well as other interesting examples.
Choosing the HTTP Client
Since Karate 0.3.0 we may choose which HTTP client to use for running our tests, by adding the designated Maven dependencies — at the time of writing this article, Apache and Jersey implementations are supported.
For Apache, we’re adding the following dependency to our project’s pom.xml:
<dependency>
    <groupId>com.intuit.karate</groupId>
    <artifactId>karate-apache</artifactId>
    <version>0.9.5</version>
    <scope>test</scope>
</dependency>
For Jersey we’re using this dependency:
<dependency>
    <groupId>com.intuit.karate</groupId>
    <artifactId>karate-apache</artifactId>
    <version>0.9.5</version>
    <scope>test</scope>
</dependency>
Reports
Karate uses the surefire-plugin to generate standard reports in XML format that may be processed by standard mechanisms of common integration servers and providers like Semaphore.
target/surefire-reports
├── feature.user.UserManagementTest.txt
└── TEST-feature.user.UserManagementTest.xml
Continuous Integration With Semaphore
Karate tests don’t run themselves, you must run them every time you make a change to your codebase. Manual tests do not scale well, less so when working as part of a team.
We can use Semaphore Continuous Integration (CI) to automate testing, build the application, and even make deployments. Setting up CI takes a few minutes and it’s free, and once you have it configured, it’ll run your tests on every push.
Preparation
To get the ball rolling, we’re going to clone an existing Spring Boot example that showcases a lot of the concepts we learned so far:
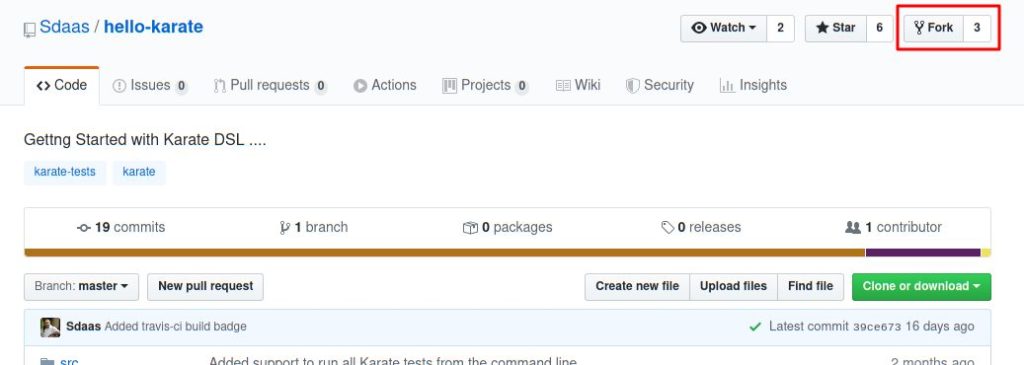
- Go to the hello-karate repository.
- Create your own fork using the Fork button:
- Use the Clone or download button. Copy the address:
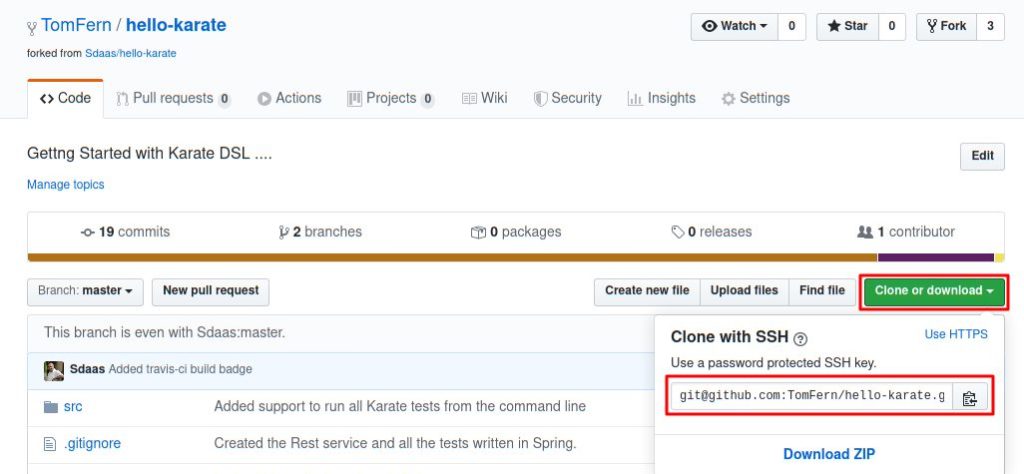
- Clone the repository to your machine with Git:
$ git clone YOUR_REPO_ADDRESS
$ cd hello-karate
Add the project to Semaphore:
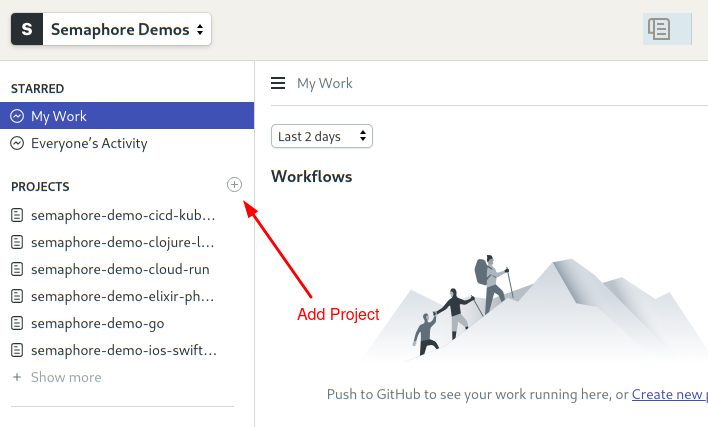
- Go to Semaphore and use the Sign up with GitHub button to get a free account.
- On the left navigation menu, click on the + (plus sign) button to create a new project:
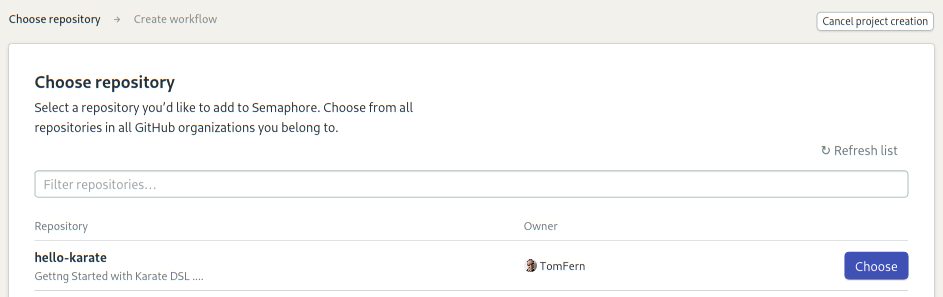
- Find your hello-karate repository and click on Choose:
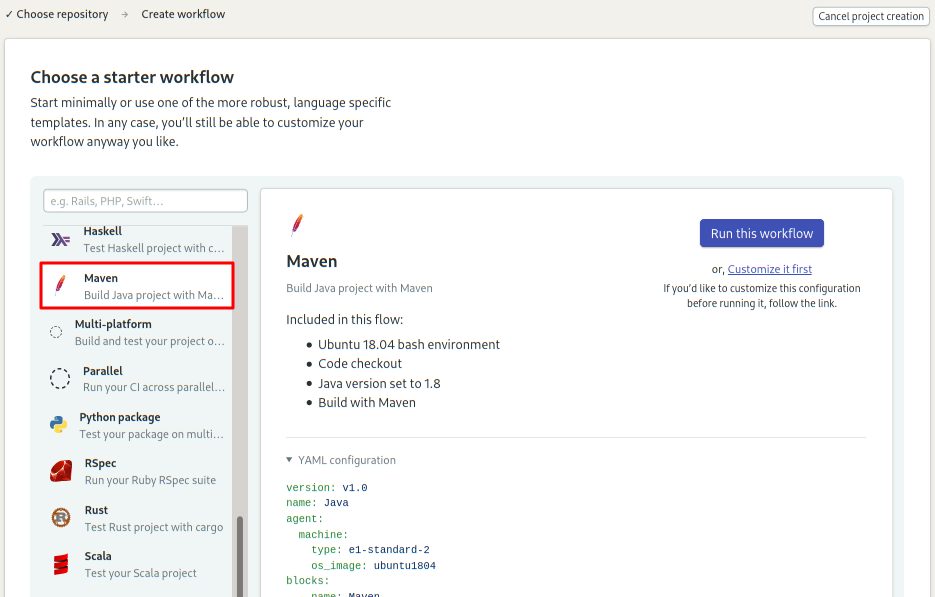
- Select the Maven workflow and click on Run this workflow:
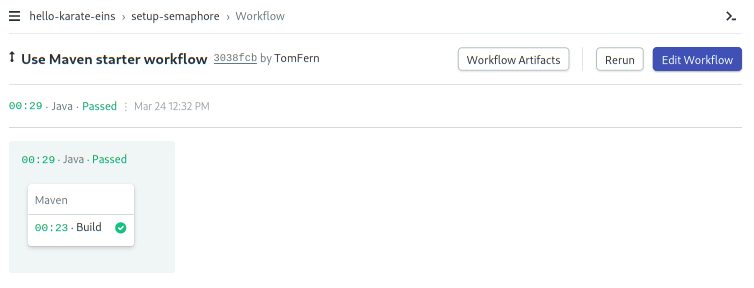
- Enjoy your new build pipeline:
Improving Build Times
The started workflow should work out of the box, but with a few tweaks, we can make it run much faster. Here’s the plan:
- Use a cache to store the Maven dependencies so we don’t need to download them each time.
- Add separate jobs to run the Spring Boot and Karate tests.
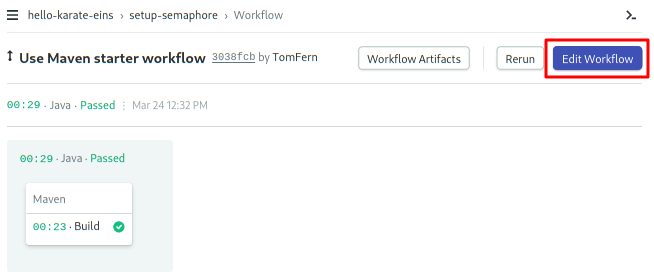
To modify the pipeline you can use the Edit Workflow button on the top-right corner:
We’re presented with the Workflow Builder. Its main components are:
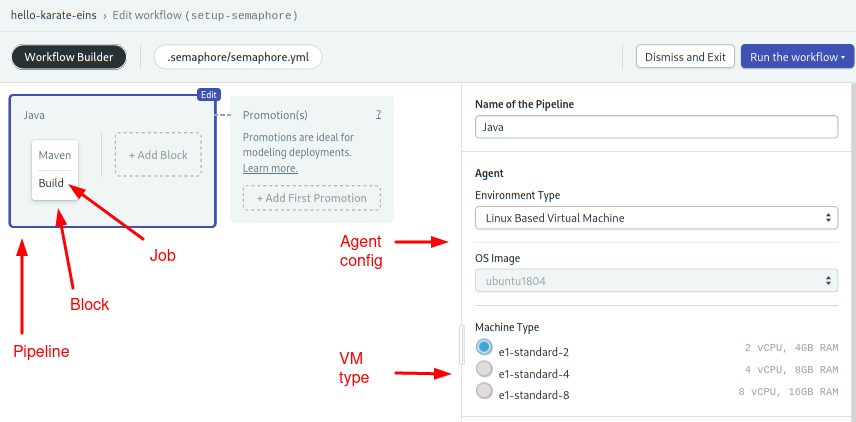
- Pipeline: Pipelines are made of blocks that are executed from left to right.
- Agent: The agent is the virtual machine that powers the pipeline. We have several machine types to choose from; the entry-level machine is perfect for our needs.
- Block: a block is a group of jobs with a common purpose and similar config. Once all jobs in a block complete, the next block starts.
- Job: jobs define the commands that do the work. They inherit their configuration from their parent block. Jobs in a block run in parallel. If any job fails, the pipeline stops with an error.
NB: to help you build faster, Semaphore has the Test Reports feature. It allows you to see skipped tests, find the slowest tests in your test suite and see which test have failed in the Test Reports dashboard.
Make the following modifications to configure the cache:
- Click on the Maven block.
- Open the Environment Variables section and create a variable:
MAVEN_OPTS=-Dmaven.repo.local=.m2
- Add this line before the
mvncommand:
cache restore- And add this line after the
mvncommand:
cache store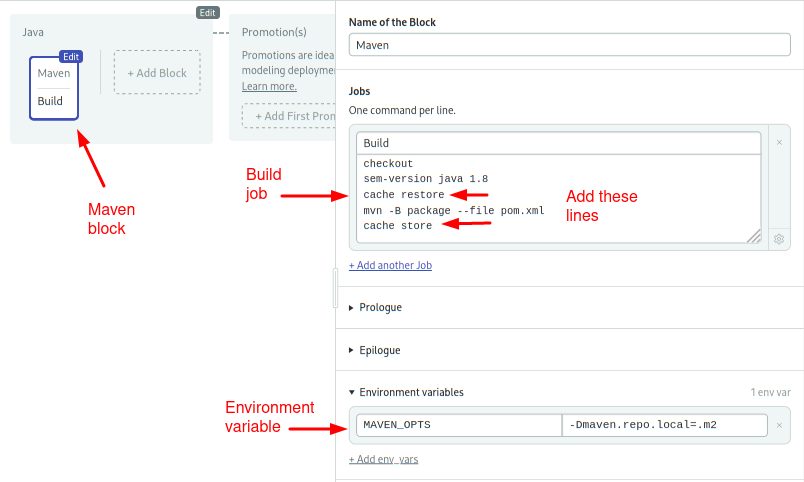
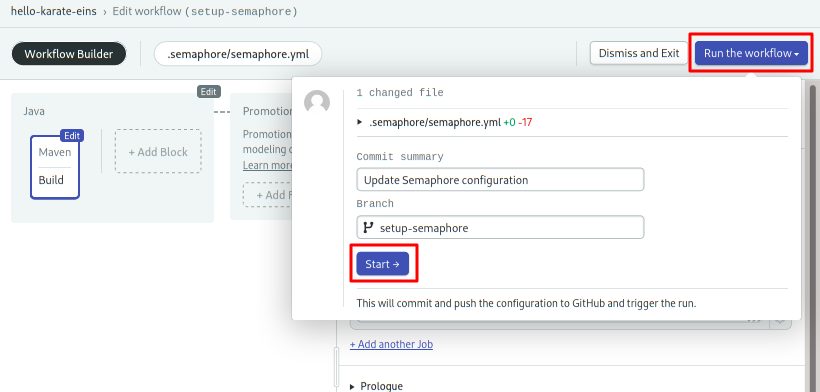
- Click on Run the Workflow and Start:
To check that it’s using the cache, click on the job to see it’s logs:
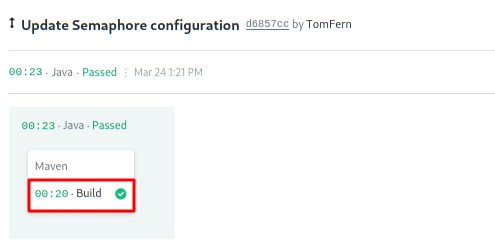
You should see a message like this near the end:
cache store
==> Detecting project structure and storing into cache.
* Detected pom.xml.
* Using default cache path '.m2'.
Key 'maven-setup-semaphore-df8b6faf2a6b89127c20a84b4f305f67' already exists.
* Using default cache path 'target'.
Key 'maven-target-setup-semaphore-df8b6faf2a6b89127c20a84b4f305f67' already exists.
exit code: 0 duration: 1s
export SEMAPHORE_JOB_RESULT=passed
The Semaphore Toolbox
We’ve used special commands in the last section. I think this is a good point to learn about the Semaphore built-in toolbox:
- checkout: the checkout commands clones the correct revision of the GitHub repository and changes the directory. It’s usually the first command in a job.
- sem-version: with sem-version, we can switch the active version of a language. Semaphore fully supports many languages, including Java.
- cache: the cache is your project file storage. Cache smart enough to figure out which files have to be stored and retrieved. Cache only scans the current directory and subdirectories, that is why we had to change Maven install policy with the
MAVEN_OPTSvariable.
Doing Karate
We’ll create a Tests block with two jobs. Since they are independent, we’ll use parallel testing to run both of them simultaneously.
- Unit tests: to run the traditional unit tests that ship with this Spring Boot project.
- Karate: to run the Karate tests located in
test/java/feature.
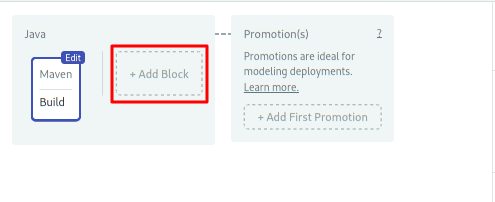
Open the Workflow Editor again:
- Click the Edit Workflow button.
- Click the +Add Block button:
- Open the Prologue section to type the following commands. The commands in the prologue are executed before each job in the block:
checkout
cache restore
mvn -q test-compile -Dmaven.test.skip=true- Open the Environment Variables section and create
MAVEN_OPTSagain, exactly like before. - Change the name of the job to “Unit tests” and type the following command:
mvn test- Create a new job using the +Add new job link. Set its name to “Karate tests”.
- Type the following commands:
mvn spring-boot:run &
mvn test -Dtest=KarateTests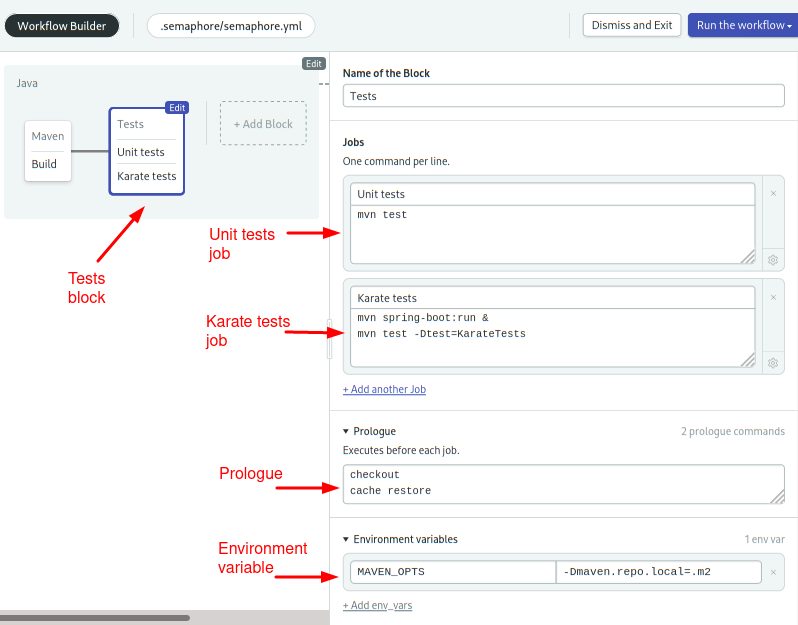
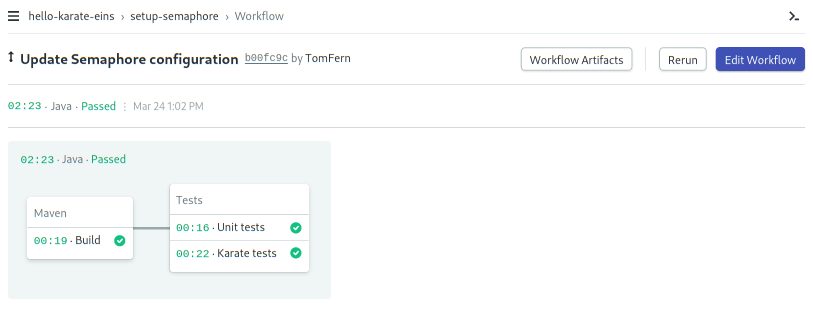
- Click on Run the Workflow and Start.
Your CI pipeline is now ready!
Next Steps: Deployment
Semaphore is not limited to building and testing our code, you extend your workflow with Continuous Deployment (CD) to automatically release new versions to the platform of your choice.
Kubernetes is one increasingly popular alternative for several reasons:
- Support: Kubernetes is supported by almost every cloud provider.
- Resiliency: Kubernetes supports no-downtime upgrades and high availability out of the box.
- Scalability: Kubernetes can scale up and down the capacity on the fly.
Check the following tutorials to learn how you can deploy to Kubernetes with Semaphore:
- Kubernetes CI/CD for Spring Boot Microservices
- A Step-by-Step Guide to Continuous Deployment on Kubernetes
- How to Release Faster with Continuous Delivery for Google Kubernetes
- Learn all about CI/CD on Docker and Kubernetes
- Sign up to receive a free ebook guide to CI/CD with Kubernetes
Conclusion
We hope that this tutorial helped you to get a basic understanding of Karate’s features and possibilities and that you now have another utility in your toolbox for testing web services of all kinds.
If you found this testing framework interesting, please feel free to share this tutorial. You’re also welcome to leave any comments or questions here!
Happy testing 🙂
