Hilz’ Slushy Guide to the Iceberg
To solidify, add information
Last Updated July 4, 00:00 UTC
What’s New
- Frostwing Commander drops Well-Sealed Canister in Hidden Depths
- Expanded discussion of (almost) guaranteed catch mechanic for Deep mouse
- Deep mouse run approach
Table of Contents
Getting to the Hidden Depths and Deep Lair
Treacherous Tunnels: 0 to 300 feet
Brutal Bulwark: 301 to 600 feet
The Mad Depths: 1601 to 1800 feet
The Hidden Depths: 1801 to 2000 feet
Crafting the Steam Lasers (table)
Steam Laser Characteristics (table)
Visualization, Modeling, Calculators, ...
Iceberg related Feedback Fridays (recordings)
Iceberg related Feedback Friday Reviews
Appendix C: Original Deep Freeze base blueprints
At a Glance
Win 2000 feet through 5 zones to get to the Deep Lair
- Defeat the General mice in between the zones along the way
- Craft the Deep Freeze base to gain access to the Hidden Depths and the Deep Lair
- Reach the Deep Lair within 249 hunts and defeat the Deep mouse to save Gnawnia!
Goals
- Get ready: hunt for supplies at the Slushy Shoreline
- At least enough trap parts to craft Steam Laser Mk. I
- At least 200 war scraps
- catch the Frostwing Commander: drops
- well-sealed canister, used to upgrade Steam Laser Mk. I to Mk. II
- catch Icewing: drops
- Deep Freeze base blueprints
- Steam Nine, used to:
- craft Deep Freeze base
- upgrade broken Steam Laser Mk. II to Mk. III
nope, can’t use the same one to do both!
- catch Deep Mouse
Hunters can achieve these goals using a variety of approaches. I present two, one designed primarily for hunters who donate regularly and an alternative designed primarily for those who do not.
Hunters who are not already familiar with the details of the Iceberg may wish to read the rest of the guide and return to the approaches afterwards.
Approaches
Full-out Assault
This approach assumes you use at least some SB+ (although by no means exclusively SB+). If using only Gouda and Brie, see the alternative approach. You may find looking at the live versions of the attraction and setups tables useful while reading the strategy below.
- Collect trap parts and war scraps at the Slushy Shoreline:
- War scraps: at least 200
- Trap parts:
- 10 each wire spools and frosty metal and 7 heating oil (enough for your Steam Laser Mk. I and Magnet base) at an absolute minimum
- to personalize, read the full sequence and see the trap parts planning table
- Craft Steam Laser Mk. I
- Travel to the Iceberg for your first run
- Use Steam Laser Mk. I
- Dragon Jade base
- Charms as desired (consult setups tables, including charms table. Don’t waste charms here that would be better spent elsewhere!)
- What cheese? Depends on how many runs you plan to do, but a mix of SB+ and Gouda will do well:
- stick with SB+ for Brutal Bulwark and Mad Depths
- if you are not a preferential SB+ user, you can use Gouda for Tunnels and Bombing Run
- What about the ice drills and drill charges? Buy the ice drills by all means and continue to upgrade them as you go, but save the drill charges for your Deep mouse runs.
- (Note that the Magnet base does not increase Chipper attraction in the Mad Depths. Hearthstone base does.)
- At the end of the first run, craft the Remote Detonator base
- If you earned two or three bonus chests, craft the Magnet base as well
- During second run:
- Use Magnet base (if crafted) in Tunnels
- Use Remote Detonator base in Bombing Run
- As soon as you have enough bottled cold fusion to do so, upgrade to Steam Laser Mk. II (buy Ice Drill Mk. II), as long as you do so in time to use it to catch Icewing
- Icewing breaks your Mk. II
- At the end of second run
- Craft Steam Laser Mk. III (buy Ice Drill Mk. III)
- Could you use this Steam Nine to craft the Deep Freeze base and tie yourself in knots trying to figure out how to get the Deep mouse in three runs? Probably, but you would burn immense resources doing so for no lasting benefit. The area yields a solid, sustainable return in points and a decent amount of gold once you have all the area bases: if you go too far down the path to all out assault you will burn resources you need to get those bases and spend even more resources getting them, or have to move on without reaping the true benefit of the area.
- Even If you have the Diamond drill bits, don’t buy it yet. If you buy it, you’ll use the drill charges, and the earliest time you can collect the full set of traps and bases is part way through your fifth run.
- Craft Spiked base as soon as you have enough cold fusion, sometime in the third or fourth run
Why Spiked base rather than Hearthstone or Deep Freeze?
- With a full set of 8 drill charges, the Diamond Ice Drill saves you 160 feet.
- The Bulwark is 300 feet long, even if you used all 8 charges you would still need to traverse 140 feet of Bulwark.
- The Mad Depths are 200 feet long, leaving only 40 feet after 8 charges.
- What about going straight to the Deep Freeze base? Your chances of making it to the Deep mouse are small, indeed, without Spiked.
- When you accumulate another 10 cold fusion, craft the Hearthstone base. Make sure to craft Hearthstone before you run out of free drill charges from drill upgrades or you will find yourself back in Furoma farming gold.
Why not go straight to the Deep Freeze base? If you have tons of gold and plan on leaving the area after one successful Deep mouse run never to return, it may make sense to skip Hearthstone. With a Hearthstone base, you can farm 3 to 4 drill charges per run once you have crafted all your traps and bases using Gouda. You can use those drill charges for Deep mouse runs or sell them in the Marketplace, as you wish. Without a Hearthstone base, you will have to buy drill charges off the Marketplace for Deep mouse runs, which is extremely expensive.
- Once you have:
- all the bases
- the Steam Laser Mk. III
- the Diamond Ice Drill
- a full set of drill charges
you are ready to take on the Deep mouse.
Relax and Enjoy the Ride
Hunters who do not use SB+ beyond what they receive in their loyalty chests will find a relaxed approach more rewarding. (You may find looking at the live versions of the attraction and setups tables useful while reading the strategy below.)
- Start hoarding the SB+ you get in your daily loyalty chests
- Hunt at Slushy Shoreline, collect:
- At least 200 war scraps
- you’ll need 50 splintered wood, too, for one of the bases
- Collect enough of the specialized trap parts to craft your Steam Laser Mk. I and head for the Iceberg
- First pass through Iceberg, use Brie (or Swiss, if desired):
- do not use drill charges; the Living Salt minimizes time spent in the Mad Depths
- craft Magnet base before entering Mad Depths first time (but don’t use it)
- Second pass through Iceberg, use Brie or Swiss
- use Magnet base in Tunnels
- craft Remote Detonator base to use in Bombing Run second time
- Magnet has no attraction bonus
- do not use drill charges as per 1a.
- Third pass through Iceberg, use Brie or Swiss
- use Magnet in Tunnels, Remote Detonator in Bombing Run as in second Pass
- do not use drill charges as per 1a.
- craft Spiked base at the end of the run (why Spiked base? See explanation in previous section)
- Fourth pass through Iceberg, needs to be under < 425 hunts
- setups:
- Tunnels: SLM1 / Magnet / (Wax or Sticky) / Brie
- Bulwark: SLM1 / Spiked / Sticky / Gouda
- Bombing Run: SLM1 / Remote Detonator/ Sticky / Brie
- Mad Depths: SLM1 / Dragon Jade / Sticky / Gouda
- in the Mad Depths:
- don’t use your drill charges, save them for when you have SLM III and can use them to have runs under 275 hunts, winning the Diamond Drill bits and all three bonus chests
- depending on how well you are doing, you may find that you don’t need to use Gouda and can switch back to Brie
- keep in mind that SLM II is only 50% effective against Icewing, so, while most hunters catch her after a few attempts, it can take 20 or more tries. Leave yourself a buffer of 30 hunts to catch your last general, some guards and Icewing
- upon entering Icewing’s Lair:
- craft Steam Laser Mk. II
- immediately arm Mk. II
- catch Icewing, she breaks Mk. II (take a moment to check out what Mk. II, broken, looks like, it is pretty funny)
- craft Steam Laser Mk. III
- congratulations!!!
- Go buy a bunch of drills!
- buy each one you can in sequence, because they come with free drill charges
- remember that you only get each set of free drill charges once: even if you go back and buy another one of the drill you just traded in to get your nifty new upgraded drill, you won’t get another set of free drill charges.
- Now that you have SLM III, you can get one to two chests each run, depending on your cheese (Brie vs. Gouda) and charm usage. When you get the Hearthstone base, you can get two to three chests each run.
- When you accumulate another 10 cold fusion, craft the Hearthstone base (Why Hearthstone? See explanation in previous section.)
- With your Hearthstone base in hand, you are ready to complete your next two tasks at the same time:
- you need 6 more cold fusion for your Deep Freeze base
- you need those Diamond Drill bits so you can get the Diamond Ice Drill
You will need to finish a run in fewer than 275 hunts. Don’t worry, though, with SLM III, Gouda, all the bases and some of those drill charges you have been hoarding, you can do it!
- Now run around the kingdom collecting the rest of the bits ‘n pieces and craft your Deep Freeze base
- Before you go after the Deep mouse, you need to gather 250 SB+, but don’t worry: with the price for drill charges in the marketplace you can farm enough gold to buy the necessary SB+ in a couple of runs even at the current insane Marketplace prices for SB+. Do a couple of gouda runs, sell the drill charges and buy your SB+, then go on to the Deep mouse approach. Is it possible to get the Deep mouse using only Gouda? Theoretically, yes. You are likely to spend far longer in the attempt, however, than if you take a more sensible approach and buy the stuff on the Market. Using SB+ does not mean donating.
Deep mouse runs
- Once you have:
- all the bases
- Steam Laser Mk. III
- the Diamond Ice Drill
- a full set of drill charges (8)
- at least 100 sticky charms, preferably a full set of 250
- 250 SB+
you are ready to go after the Deep mouse, affectionately known as BUF (for Big Ugly Fish). Is it possible to get BUF without one or more of these items? On rare occasions, yes, but we are not interested in rare occasions, we are interested in predictable results.
- You have to reach the Deep Lair in 249 hunts or less (see Running out of hunts)
- Once you reach the Deep Lair, BUF is (almost) a guaranteed catch at hunt 250. Why almost? As the saying goes, it is possible for any trap to catch any mouse and for any trap to miss any mouse, so don’t get silly and tempt fate (Yes, you! Put away that Tacky Glue Trap!)
- What incentive is there to catch BUF before hunt 250, once you reach the Deep Lair?
- BUF drops 1 to 10 each: Deep Thoughts (10,000 point bonuses) and satchels of 10,000 gold. If you catch BUF on or before hunt 241, you get 10 of each. At 242, you get 9 of each, at 243, you get 8 of each, and so forth on to hunt 250, at which point you get 1 of each.
- What about before hunt 241? Bragging rights via the Invasion scoreboard.
- You’ll also need a full set of 8 drill charges:
- Use 3 drills to drill past generals (saving the hunts to catch them, as well as the feet normally lost when you are stopped by the challenge)
- Use a drill charge at around 288 to 290 feet. (Much earlier than that and there’s not much point as progress in the tunnels is rapid. If you wait much longer, though, you are almost guaranteed to end up at the challenge.) Don’t worry if you end up facing this general, drilling past it is only an advantage if roughly half the distance is in the Bulwark.
- Use a drill charge at as close as you can get to 581 feet (your goal is to drill past the general at the end of the Bulwark, while using as much of the charge as possible in the Bulwark). Ideally, you would drill from 581 feet to 601 feet, but 586 to 606 feet is fine, too. Don’t drill before 581 feet, though.
- If you stop anywhere between 1590 and 1599 feet, use a drill charge to enter the Mad Depths. As with the tunnels, using it earlier defeats the purpose, and not getting to do this means you traversed those last 10 feet in a single hunt and you still have your drill charge to use in the Mad Depths.
- Use your remaining drill charges in the Mad Depths. In most cases, it makes sense to use them right after you enter the Mad Depths.
Suggestions? Comments?
I can be found:
- Mousehunt Guide facebook page (shared with my collaborator, Jester Nim)
- My blog (sporadic postings)
- via email
Slushy Shoreline
- Use soft serve charms (650 g, 100 power, slushy shoreline charm store) to attract Icebreaker, Saboteur and Yeti, which drop crafting items needed to buy traps and bases in the Iceberg.
- The Incompetent Ice Climber is allergic to ice cream, it seems (attraction rate < 1% with soft serve charms).
- All mice at Slushy Shoreline are attracted to Gouda except for Living Ice, which can only be attracted using SB+.
- Crafting item loot drops are not 100%.

Which bait should I use?
Both Gouda and SB+ work well at Slushy Shoreline, which is a nice change from some high level areas. Insufficient data is available concerning Brie.
All mice at Slushy Shoreline are attracted to Gouda except for Living Ice, which can only be attracted using SB+. Living Ice can drop any of the crafting items and is much weaker than the rest of the Iceberg mice, therefore it is the most desirable mouse at Slushy. Furthermore, even before Living Ice was released, using Gouda resulted in a slight but definite reduction in loot dropped per catch.
Considering all the available information, Slushy Shoreline is a good use of SB+.
Slushy Shoreline mice (table)
Mouse | Sub-group | Loot | ||||
Saboteur | Bomb Squad | only | ||||
Yeti | Brute | only | ||||
Snow Bowler | Brute | |||||
Icebreaker | Tunnel Rat | only | ||||
Chipper | Tunnel Rat | |||||
Snow Sniper | Bergling | only | ||||
Snow Slinger | Bergling | |||||
Polar Bear | Bergling | |||||
Snow Soldier | Bergling | |||||
Incompetent Ice Climber | Bergling | |||||
Living Ice | Bergling | only |


Iceberg
Mechanics
Hunting through the Iceberg
Each catch or miss moves you through the Iceberg. FTAs consume hunts but do not move you.
- How a catch or miss affects you depends on the mouse, not the zone
- Catching a Bergling or a Bomb Squad mouse advances you. Missing one pushes you back.
- Catching a Tunnel Rat or Living Salt advances you. Missing one does not affect your progress, although it does cost you a hunt.
- Brutes push you back on both catches and misses.
- Catching a Zealot does not advance you and missing one pushes you back.
- You cannot skip the Challenge at the end of a zone by catching a mouse that moves you past it: you will be stopped at the end of the zone and lose any feet in excess of those needed to reach the end of the zone. For example: if you are at 298 feet and catch an Icebreaker, you will advance 2 feet to the end of the tunnels to face the Challenge, rather than the usual 16 feet for an Icebreaker.
- You can only be pushed back to 1 foot after the start of a section, presumably to prevent hunters from deliberately missing at the start of a section, thus getting multiple challenges with associated bottled cold fusion drops.
- Wax and sticky charms can also affect whether you advance or are pushed back
For the curious, the iceberg and the hidden depths
Speed counts
The Iceberg HUD displays how many hunts and trap checks you have used so far in your current run as “Hunt #X”. Drilling does not cost hunts.
The number of hunts plus trap checks you take to finish the Iceberg makes a difference. Finish quickly; get a bonus. Finish too slowly; Icewing gets bored and leaves.
Bonus Chests (table)
hunt 424 | hunt 349 | hunt 274 | Points | |||||||||||
Treasure Chest | 1 | 1 | 2 | 2 | 2 | 5 | 5 | 2 | 100,000 | 150,000 | ||||
Strongbox | 1 | 2 | 2 | 2 | 5 | 1 | 75,000 | 100,000 | ||||||
Supply Chest | 1 | 1 | 1 | 1 | 5 | 5 | 50,000 | 50,000 |


Running out of hunts
Hunt 249
If you are in the Hidden Depths when you reach hunt 249, you get this message in your journal:
With the Iceberg crumbling all around you, you figure you have but one more turn left. It's time to put everything you have into this one final hunt!
Hunt 250
If you are in the Hidden Depths when you reach hunt 250 you get this message in your journal:
It's too dangerous to hunt here any longer! With seconds to spare, you jump in your life raft and paddle furiously away, swearing to return next time and conquer!
If you have not reached the Hidden Depths by hunt 250, you will not be able to reach it during your current run.
Hunt 425
The Iceberg has smashed the last of the bonus chests, and Icewing has moved on to supervise another Iceberg invasion.
She has left her second-in-command in charge, who must still be defeated to destroy the Iceberg and protect the good people of Gnawnia.
Before the release of the Hidden Depths, once the Supply Chest has been smashed, the Living Salt mouse was turned loose, preventing you from wandering forlorn through the Iceberg:
With most of the fighting mice leaving the Iceberg, the Living Salt mouse can finally roam free, making progress significantly easier.
It appears that Living Salt can now be attracted in any of the five main Iceberg zones. Whether hunt 425 affects Living Salt’s population remains to be seen.
Drilling
Buy each of the Ice Drills from the Iceberg or Slushy Shoreline General Stores:
- the FIRST time you buy a drill, you get a set of free drill charges with it
- whether you use that particular drill or not, the drill charges are very valuable
- note that the free drill charges only come with the first purchase. If you upgrade your drill, then go back and buy a lower-level drill again, you won’t get more free drill charges (bummer, right?)
Core facts about drilling
- Drilling advances you 20 feet per drill (it does not count as a hunt).
- Hunters can only have one of each drill in their inventory.
- Your drill can be used a limited number of times during an invasion.
- Defeating an invasion resets your Ice Drill, so you can use it again
- However, it does not get you more Drill Charges!
- Retreating, it seems, does not reset your Ice Drill
- If you use your drill the maximum number of times during a run then upgrade to the next drill during the same invasion, you can drill one additional time during that run, bringing you up to the maximum of your new drill.
- Some hunters have seen a message telling them their drill was stuck. They had bought the Diamond Ice Drill out of sequence and were being prompted to go back and buy the earlier drills in order to get their free Drill Charges.
How to Drill
- To drill, click on the big orange button that says ‘DRILL!’
- Drilling does not count as a hunt
- You can drill at any time
- Drilling shows up as a separate journal entry
Where to Drill
- Of any of the zones, you will always get the most benefit from drilling in the Mad Depths.
- Never drill within 20 feet of the end of a zone (except during Deep mouse runs):
- drilling closer than 20 feet away from the end of a zone will advance you past the General, missing the opportunity to collect a bottle of cold fusion;
- Drilling exactly 20 feet from the end of a zone, for example, from 580 feet to 600 feet, will bring you to the Challenge (verified by HitGrab Support).
- Think ahead: use your drill charges to bring yourself close to the end of a zone:
- 1775 feet, hunt # 268
- drill one time, advances you 20 feet
- 1795 feet, hunt # 268
- catch Iceblock mouse, advance 8 feet, stopped after 5 feet at end of Mad Depths
- 1800 feet, hunt #270
- You can use your drill in the Hidden Depths, it is just a waste to do so.
About Drill Charges
- Each time you drill, it consumes a drill charge
- Drill Charges are compatible across drill types. In other words, leftover drill charges from your Ice Drill Mk. I will work with your Ice Drill Mk. II, etc.
- Where to get more Drill Charges:
- as loot: the Frostwing Commander and Icewing drop one when you catch them
- buy them inside the game:
- at the Iceberg General Store for 2 cold fusion, 5 war scraps and 5,000 gold per charge
- in the Marketplace, under ‘Special’
- for donation (and support Mousehunt!):
- the Iceberg Invasion Kit contains 5 Drill Charges, as well as wax / sticky charms and SB+
- a set of 3 Drill Charges is available by donation
- the Drilling Gift Set contains 2 Drill Charges, as well as wax and sticky charms
- remember! Buying drills that you previously owned before upgrading your drill will not get you another set of free drill charges
- note that Drill Charges are not giftable, unlike other tradeable items
The Ice Drills (table)
Ice Drill | must have | spent | initial | uses / invasion | ||||
Mk. I | 50,000 | 10 | 3 | 5 | ||||
Mk. II | 100,000 | 25 | 3 | 6 | ||||
Mk. III | 150,000 | 50 | 4 | 7 | ||||
Diamond | 300,000 | 100 | 5 | 8 |


The Challenge
After you finish a zone, before you begin the next, the mice from the General sub-group challenge you to a duel
- Each challenge begins with all four General present. Which General you attract appears to be random.
- Once you attract one of the Generals, only that General shows in the effectiveness meter
- When you catch a General
- the General drops a bottle of cold fusion
- you advance 4, 8, 12 or 50 feet into the next zone, depending on the General
- If you miss a General
- If you miss General Drheller, he pushes you back 6 feet. You get pushed back into the previous zone and have to hunt your way forward to the end of the zone. When you reach the end of the zone, however, General Drheller is there waiting for you!
- the other Generals do not push you back
- you re-engage the same General on the next hunt, for up to three hunts
- on the fourth hunt, all four Generals appear and the cycle repeats.
- As wax and sticky charms do not affect Generals, use charms that enhance the power aspect of your setup (Iceberg is power oriented.) Champion charms work well, as do super power charms.
- If you catch a mouse that would move you past the challenge, you will be stopped at the end of the zone to face the challenge
- Do not use your drill within 20 feet of the end of a zone or you will skip the Challenge.
- Do not skip the challenge!! Generals drop (one) bottled cold fusion, needed to upgrade your Steam Laser and craft the subgroup-specific bases
Getting to the Hidden Depths and Deep Lair
To get to the Hidden Depths, and thus to the Deep Lair, you have to catch Icewing using the Deep Freeze base before hunt number 249.
Wax and Sticky Charms
Wax and sticky charms only interact with catches and misses of mice from the Bergling sub-group
- Both wax and sticky charms provide 150 power, no power bonus, no luck. They come in 5-packs from the Iceberg Charm Shoppe as well as in various donator kits.
- Catching a Bergling mouse with a wax charm gains you an extra foot
- Miss a Bergling mouse with a sticky charm, and you will not get pushed back
Wax charms lose more ground than they gain unless the overall catch rate of Berglings in a zone is at least 80%.
- Use sticky charms with the subgroup-specific bases: these bases are universally weak, resulting in Bergling catch rates below 80%.
- We’ve found very limited circumstances in which wax charms are useful: with Dragon Jade and Steam Laser Mk. II / III before a hunter gets their Magnet base. However, you end up with a steady stream of the things from drops so the question becomes where to use them? Once you have all your bases and your Mk. III they do fine in the tunnels and bombing run on runs during which you aren’t trying for the deep
Iceberg Currency: War Scraps
War scraps are the currency used in the Iceberg shops. You can smash excess wire spools, frosty metal and cans of heating oil to get war scraps. One trap part produces three war scraps.
Pause, Retreat and Abort
You can pause an Iceberg run indefinitely (unlike Zugzwang’s Tower), as leaving the Iceberg does not reset your progress.
For the cost of one cold fusion and 25,000 gold, you can buy a Cold Fusion Bomb and abort an Iceberg run at any time:
When activated on the Iceberg, this complex creation destabilizes the ice instantly, melting the Iceberg in a flash.

It may be used at any time, but the great flood of water generated swamps the player, sending them to the Slushy Shoreline, and scatters the bonus chests, rendering them uncollectible.
Further, because the mice on the iceberg were not defeated, this does not count as an Iceberg completion so far as the King's record keepers are concerned.
Once you have exceeded 275 hunts, you can retreat for free using the ‘Retreat!’ link in the upper right hand corner of the Iceberg HUD and try again. Keep in mind, though, that Living Salt will bail you out once you go over 425 hunts. Retreating is an option for the truly impatient or deeply frustrated, for example, if you are specifically trying to get the Diamond Drill Bits and are very impatient (you’ll get them eventually.)
Zone by Zone
Treacherous Tunnels: 0 to 300 feet
Even without a Magnet Base, the Tunnels are not particularly difficult. With the Magnet base, the Tunnels are fun.
Core Characteristics
- Population: Tunnel Rats & selected Berglings
- twice as many Berglings as Tunnel Rats (see attraction table)
- Catching a Tunnel Rat advances you 16 feet.
- Missing one does not push you back.
- The Magnet base doubles the attraction rate of Tunnel Rats
- Gouda has an overall attraction of 86%
Analysis
- If you use sticky charms in the Tunnels, you will never move backwards, only forwards, because Tunnel Rats do not push you back.
- Gouda’s strong performance makes it a viable option in the tunnels, especially when combined with a base with an attraction bonus.
Recommendations
- see also setups table
- With the Magnet base, use sticky charms. Chrome charms provide a marginal improvement over sticky charms but nowhere near enough of an improvement to justify their use.
- Without Magnet:
- if you have wax charms to get rid of, now is a fine time to use them: they do a tiny bit better than sticky;
- otherwise stick with sticky
- do not waste champion charms in the tunnels, you do not need them here
Brutal Bulwark: 301 to 600 feet
Core Characteristics
- Population: Brute (squad, lol) & selected Berglings
- The Brute Squad are all stronger than the Berglings
- Without the Spiked base, Brute mice push you back 4 feet when you catch them (!!) and push you wayyyy back (16 or 20 feet, depending on the Brute) when you miss.
- On the other hand, the Berglings in the Bulwark all advance you 8 feet when caught.
- SB+ attracts five times as many Berglings as it does Brutes in the Bulwark
- Gouda attracts six times as many Berglings as it does Brutes in the Bulwark, with an overall attraction rate of 85%.
- The difference in the attraction between SB+ and Gouda has now been tested and shown to be statistically significant.
Analysis
- Expect to spend between two and three times as long in the Bulwark as you do in the tunnels.
- If you get through the Bulwark in a few hunts less than twice the time you spent in the tunnels, you have had an amazing pass (or a horrible one through the tunnels!)
- If you go over three times as long as the tunnels, it won’t always be that bad
- Gouda’s reduced attraction to Brutes comes at the price of lost hunts, however, Brute catches are far more costly in the Iceberg than missed attractions.
- Given the major difference between how far back Brutes push you when you catch them and when you miss them, catching Brutes is the highest priority in the Bulwark until you craft the Spiked base.
- With the Spiked base and sticky charms, you only move forwards, as in the Tunnels.
Recommendations
- see also setups table
- Regardless of base, give strong consideration to using Gouda in the Bulwark.
- Without the Spiked base, use Dragon Jade plus wax or sticky charms
- chrome charms average a savings of one hunt (total) in the Bulwark
- gold base and champion charms average a savings of three to four hunts (total) in the Bulwark
- With the Spiked base use sticky charms with any of the Steam Lasers
- Should you drill in the Bulwark?
- No. Drill Charges are always better used in the Depths
Bombing Run: 601 to 1600 feet
Core Characteristics
- Population: Bomb Squad, Tunnel Rats, Snow Bowler & selected Berglings:
- The Snow Bowler is the strongest mouse
- Next strongest are the three Berglings
- The mix of Bomb Squad and Tunnel Rats are weakest
- Catching a Bomb Squad mouse advances you and missing one pushes you back.
- With the Remote Detonator base, Bomb Squad mice catches advance you 20 feet.
- The Magnet base:
- doubles the attraction of Tunnel Rats;
- all the increase in Tunnel Rat attraction comes at the expense of Berglings.
- Without any of the subgroup-specific bases:
- Catching a mouse results in the highest average number of feet advanced of any zone
- Gouda and SB+ have very similar attraction profiles, except that Gouda has an overall attraction rate of 86%
- Snow Bowlers comprise about 5% of attractions
- Berglings comprise almost half (45%) of attractions
- For every three Bomb Squad mice that you attract, you will attract, on average, two Tunnel Rats
Analysis
- The attraction rate of Snow Bowlers is sufficiently low as to render them little more than a nuisance.
- The Bombing Run has the smallest Bergling population: wax and sticky charms have the least effect here.
Recommendations
- see also setups table
- Without any of the subgroup-specific bases:
- If you are really, truly determined to use your chrome charms, you’ll gain ten hunts here. Even looked at proportionately, in terms of gain per total hunts, you’ll get more out of using them here. That said, it is a lousy use of a very valuable charm. Do you really have close to a million gold per run to burn?
- sticky charms do quite well
- With SB+, the Remote Detonator base advances you about 1 foot per hunt faster than the Magnet base
- which translates into a savings of roughly 14 hunts
- use sticky charms (chrome charms save an average of 5 hunts)
- as Remote Detonator has a 10% attraction bonus to Magnet’s none, the improvement is larger for Gouda, Brie, etc.
- The length of the Bombing Run can be tiring unless you adjust for it mentally. With the Remote Detonator base or the Magnet base, you can make up lost hunts in this zone.
The Mad Depths: 1601 to 1800 feet
Core Characteristics
- Population: Zealots, Chipper, Snow Bowler & selected Berglings
- Catching a Zealot does not advance you. Missing one pushes you back 5 feet.
- Zealot mice are extremely strong, the strongest mice thus far other than Lady Coldsnap and General Drheller, therefore misses are common.
- Two of the three Bergling mice only advance you 4 feet when caught.
- Without any of the subgroup-specific bases, with SB+ (insufficient data was available for Gouda):
- Zealots comprise over a third of attractions
- Berglings comprise roughly half of attractions
- Snow Bowlers comprise about 5% of attractions, and Chippers twice that, around 10%.
- The result is that only six out of every ten hunts, on average, even has the potential to advance you. Contrast that with the Bulwark, where eight out of every ten hunts has the potential to advance you.
Analysis
- Magnet base does not increase Chipper att
- Hearthstone base improves feet per hunt dramatically in the Mad Depths:
- dramatically reduces Zealot attraction rate (although some Zealots are still attracted)
- increases Chipper attraction rate by roughly 50%
- Note that Magnet base does not increase Chipper attraction rate in the Mad Depths
- The shorter length of the depths is also a consideration. Ultimately, a hunter need only get within drilling distance of the end of the depths.
- Without any of the group-specific bases, advancing 100 feet in the Mad Depths can easily take 100 to 150 hunts.
- Progress in the Bulwark almost oscillates: hunters begin to feel a bit like a yoyo. In the Mad Depths, in contrast, progress is simply interminably slow.
Recommendations
- Spiked base performs WORSE than dragon jade / chrome. Don’t use it.
- The Hearthstone base is necessary to make it to the end of the Hidden Depths by 250 hunts and catch the Deep mouse, so conserve your bottled cold fusion, don’t use it to buy Drill Charges.
- Until you have the Hearthstone base, hunt until you get within drilling distance of the end of the Mad Depths, then drill your way to within one to two hunts from the end. You will get another set of drill charges with the next drill.
- Set aside enough cold fusion each run so that you can build the Hearthstone base by the time you run out of drill upgrades (and the accompanying free drill charges).
Icewing’s Lair
Core Characteristics
- Population:
- Frostlance Guards
- either the Frostwing Commander or Icewing
- on your first run, no matter how many hunts it takes, the Frostwing Commander
- on subsequent runs:
- once the Supply Chest has been smashed (at hunt 425), the Frostwing Commander
- otherwise, Icewing.
- Catching either Icewing or the Frostwing Commander will defeat an Invasion, returning you to the Slushy Shoreline and resetting your Ice Drill.
- The Deep Freeze base gains two visible bonuses once you reach Icewing’s Lair:
- 9 luck
- an additional 665 power
in addition, catch rates in the horntracker database are consistently higher than the visible trap statistics predict.
- Gouda works quite well in Icewing’s Lair.
Frostwing Commander
I entered Icewing’s Lair. Icewing herself has since moved on, but she’s left behind her second-in-command, the Frostwing Commander, who must be defeated to save the good people of Gnawnia from this icy invasion!
The Frostwing Commander drops:
- 1 Well-Sealed Canister, used to upgrade Steam Laser Mk. I to Mk. II
- 1 Drill Charge
- 4 War Scraps
Icewing
I entered Icewing's Lair. This is it – the big showdown!
Remember the saying that goes “Be careful what you wish for?” Here’s what happens when you catch Icewing.
The Iceberg begins to shudder and shake, no longer held together by Icewing’s terrible magic. Her capture sets off explosions that rip through walls, collapsing entire sections at once.
Without the Deep Freeze base armed, you break the Iceberg (oops!) and start again.
Leaping from the crumbling wreckage, you notice a tunnel collapsing in the distance. If only you had more time and a safe method to preserve the Iceberg’s structure, perhaps you could have explored it!
With the Deep Freeze base, however, you stabilize the Iceberg and win through to the Hidden Depths, providing you have enough hunts left.
In response, your Deep Freeze Base emits an icy chill, and the explosions slow and then cease. The Iceberg continues to shudder distressingly, but you judge you have […] hunts remaining to explore.
Then there’s the small matter of your trap:
Fueled by her terrible defeat at your hands, Icewing has destroyed and defaced your trap in a fit of icy rage! But in her haste, she seems to have dropped something - perhaps combining it with the destroyed trap parts will create a trap she truly fears!
What she dropped, of course was:
- the Deep Freeze base blueprints
- 1 Steam Nine
- 1 Drill Charge
- 5 to 10 War Scraps
As you will need two Steam Nines, one to craft the Deep Freeze base and one to upgrade to Steam Laser Mk. III, you’ll need to make at least three passes through the Iceberg. Bummer.
Defeating an Invasion
Catching either Icewing or the Frostwing Commander will defeat an invasion.
I successfully fought through the Iceberg, destroying it and saving the good people of Gnawnia from the wrath of Icewing's invasion! In amongst the Iceberg's wreckage is three bonus chests! I obtained the following loot:1 Iceberg Supply Chest, 1 Iceberg Strongbox, and 1 Iceberg Treasure Chest.
After defeating Icewing’s Invasion (without the Deep Freeze base), you are returned to the Slushy Shoreline.
Recommendations
- Until we sort through the full characteristics of the Deep Freeze base, you may wish to use it in the Lair regardless of what hunt you are on.
The Hidden Depths: 1801 to 2000 feet
When you catch Icewing using the Deep Freeze base you gain access to the Hidden Depths. As you enter the depths your HUD changes: instead of tracking how many hunts you have used so far, it now tracks how many hunts you have left to get to the Deep Lair.
Core Characteristics
- Population: Frostlance Guards, Frostwing Commanders and Living Salt
- Catching any of the mice here advances you while missing one does not push you back.
- The Deep Freeze base retains its bonuses here.
- You can use any base, the Iceberg will not break up if you arm a base other than the Deep Freeze.
Analysis
- With a strong charm such as a super power or champion charm, traversing the Hidden Depths should take around 15 hunts. Although ultimate charms substantially increase catch rate, their effect on total hunts to traverse the Hidden Depths is negligible.
- Frostwing Commanders now drop Well-Sealed Canisters here, much to the relief of trap collectors.
Recommendations
- As in Icewing’s Lair, keep an eye on the Horntracker catch rates for the Deep Freeze base.
The Deep Lair
The only mouse in the deep lair is the Deep mouse. (See also Deep mouse runs)
Finally solving the question as to how the Iceberg is propelled, the Deep Mouse lives well below the Iceberg, dragging it relentlessly towards the shores of Gnawnia.

Only the most dedicated hunters will ever be able to encounter this monster, let alone defeat it!
When you catch the Deep mouse, it completes the job of destroying the Iceberg:
With the Deep Mouse in your trap, the Iceberg finally begins to crack apart around you. With seconds to spare, you jump in your life raft and paddle furiously away, laughing about your incredible victory!
The Deep mouse drops:
- 1 to 10 Deep Thoughts (25,000 bonus points each)
- Plankrun’s Iceberg Notes
- 1 to 10 Satchels of Gold (10,000 gold each)
Iceberg Mice (table)


Notes on Iceberg Loot
- Any mouse in the Iceberg other than those which drop designated loot drop any combination of:
- hunting research
- satchel of gold
- wax charms
- sticky charms
Traps
Trap Parts
Iceberg weapons and bases are crafted from a common set of trap parts. Each time you defeat an invasion, having read Where to Drill, you will collect at least four bottled cold fusion. You may collect more, as well as one or more sets of the other three parts, depending on how many bonus chests you earn.
Chests earned: (fusion includes loot drops from generals)
One (supply chest)
- 5 cold fusion
- 1 each: wire spool, frosty metal, heating oil
Two (strongbox and supply chest)
- 6 cold fusion
- 3 each: wire spool, frosty metal, heating oil
Three (treasure chest, strongbox and supply chest)
- 7 cold fusion
- 5 each: wire spool, frosty metal, heating oil
How many of each trap part should you collect at Slushy Shoreline? The answer varies depending on: your approach to traps (minimal set, sane medium, fanatical collector or anywhere in between); your current rank; and whether you hunt with SB+.
Trap Parts Planning (table)
The Steam Lasers
Collectors will need to do at least five runs through the Iceberg to collect all the traps and bases in the region. Making the Steam Laser Mk. II (broken) a weapon in its own right is not (just) a way to torture collectors. (Drat! I was one trap away from my last collector’s checkmark before the Iceberg!) A weapon with all zero statistics will be a great benefit to the Mousehunt analytical community.
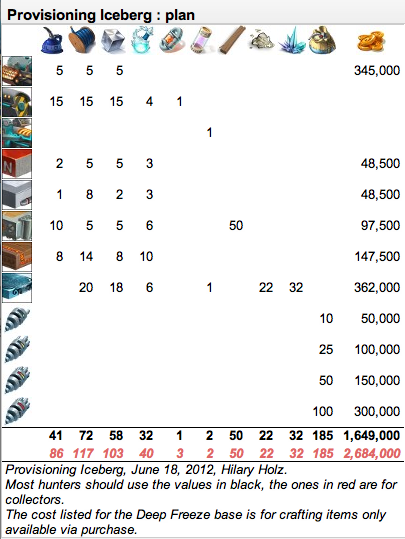
Crafting the Steam Lasers (table)
not spent! | spent | |||||||
Mk. I | 345,000 | 5 | 5 | 5 | ||||
Mk. II | 4 | 15 | 15 | 15 | ||||
Mk. II broken | ||||||||
Mk. III |


Smash your broken Mk. II to get the trap parts to craft the Mk. III.
Steam Laser Characteristics (table)


*The special power bonus is added directly to the base power of the weapon.
Differences between the Mk. II and Mk. III:
- The multiplier for Mk. III is 1500 as opposed to 1250 for the Mk. II
- Mk. III has a different effect on Icewing
- Icewing cannot smash the Mk. III
- Mk. III unlocks Ice Drill Mk. III
Although both special bonuses, power and luck, are lower for Mk. II than for Mk. I, because the base stats for Mk. II are better, it still comes out ahead.
Bases
The Slushy Shoreline general store has blueprints for four subgroup-specific bases. Blueprints for a fifth base, the Deep Freeze base, are dropped by Icewing. For those hunters who do not recognize it on sight, that green marble is a Bead of Slumber (2,000 gold from the general store at the Catacombs).
Crafting (table)
special | Blueprints | ||||||
Magnet | 3 | 5 | 5 | 2 | 48,500 | ||
Remote Detonator | 3 | 8 | 2 | 1 | 48,500 | ||
Spiked | 6 | 5 | 5 | 10 | (50) | 97,500 | |
Hearthstone | 10 | 14 | 8 | 8 | 147,500 | ||
Deep Freeze | 6 | 20 | 18 | 1162232 | Icewing |


Characteristics (table)
Special Effect | Power | Power Bonus | Special Bonus* | Attraction Bonus | Luck | Cheese Effect | ||
Magnet | 2x attraction Tunnel Rats | 250 | 10% | none | 5 | Fresh | ||
Remote Detonator | Bomb Squad catches advance 20 feet | 300 | 10% | 10% | 4 | Stale | ||
Spiked | Brute Squad catch/miss no effect | 300 | 12% | none | 3 | Very Stale | ||
Hearthstone | Reduces Zealot attraction | 200 | none | 10% | 2 | Very Fresh | ||
Deep Freeze | Stabilizes Iceberg | 35 | 0% | 665 | 0% | 0 (+9) | Uber Fresh |


*As with the steam lasers, the special power bonus is added directly to the base power of the … hrrmm … base.
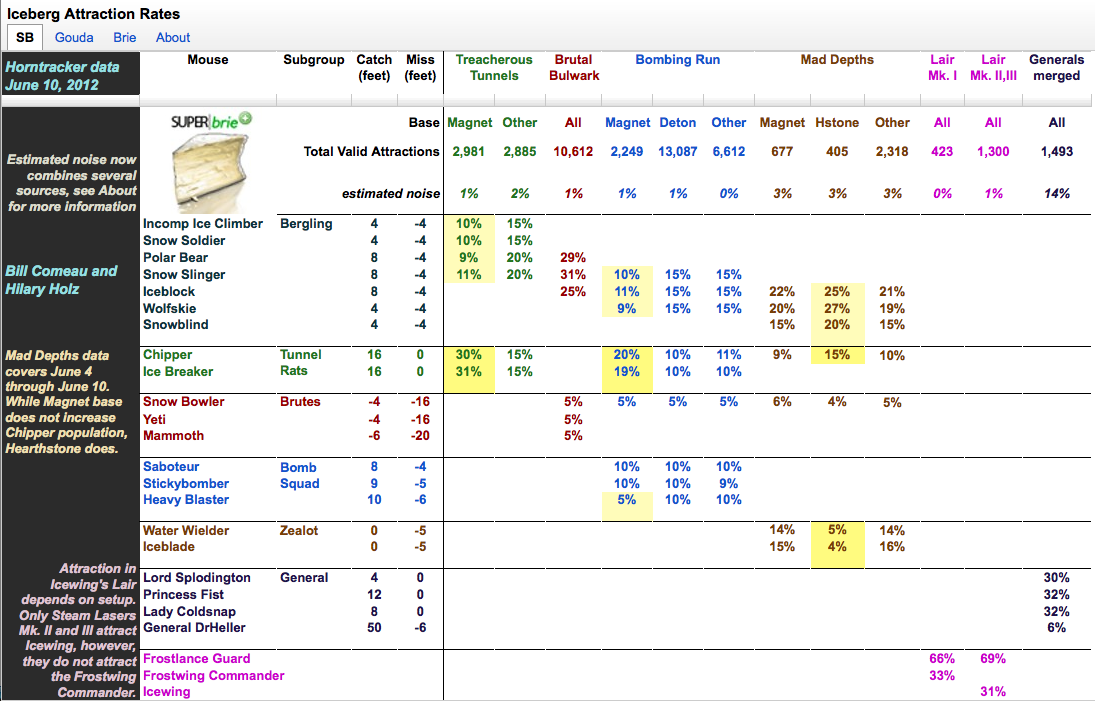
Attraction Rates (table)
As Google Docs has no facility for including a Google spreadsheet in a Google document, I include a snapshot of our live table here for ready reference. The live version has sheets for Gouda and Brie attractions as well.
Optimal Setups
The subgroup-specific bases do better in the zone they were designed for than any other base. The total number of hunts for Super|Brie+ comes in under 275 for the full range of Steam Laser, from the Mk. III down to the lowly Mk. I without drilling. For Gouda, the total number of hunts comes in under 350, again for the full range of Steam Lasers and again without drilling.
While chrome charms do result in a slight improvement in feet per hunt over sticky charms for some configurations (see charm selection), the cumulative effect over a run is at most a few hunts. Given the high cost and broad usefulness of chrome charms, sticky charms are the charm of choice in the Iceberg.
A few quick notes about the table itself (what is shown here is a snapshot of the live version).
- the live version of the tables includes sheets for:
- Steam Laser
- Mk. III
- Mk. I
- Bait
- SB+
- Gouda
- Brie
- for each zone
- the first column shows the expected number of feet per hunt (if you used that setup for 1000s of hunts in that zone, about how many feet per hunt would you get on average?)
- the second column shows the expected number of hunts it will take to complete the zone
- the number at the top, is the expected number of hunts for the best setup for that zone. Note that this number does not tell you the lowest possible number of hunts to complete the zone! In this table, we are not concerned with exceptional runs, but rather with repeatable ones.
- the best values for feet per hunt and number of hunts are highlighted in yellow.
- We add the zone hunts to the expected hunts to catch Icewing or the Commander and to clear all four generals to get an estimated number of hunts using the best setups in the table without drilling.
- concerning generals:
- feet advanced by generals are included in the best setup run
- the fact that a hunter re-engages the same general three times in a row is also included
- General DrHeller’s pushback is included, as well
Iceberg Setups (table)

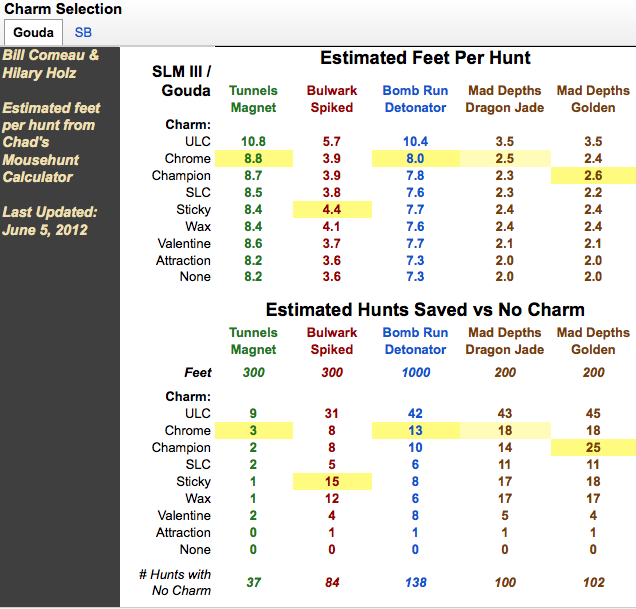
Charm selection (table)
This image is just a snapshot, see also the live version. For discussion, see optimal setups.
Invasion scoreboards
If you select ‘scoreboards’ from the purple Lore button pull-down menu, in addition to the Hunter and Tournaments scoreboards, you will find a section for Iceberg Invasion.
- Iceberg:
- Best Run
- Chests Looted
- Icewing Catches
- Invasions averted
- Living Salt catches
- Hidden Depths:
- Fastest Run
Appendix A: Iceberg Resources
Guides
- Chapter 20: Iceberg from Spheniscine’s MouseHunt Walkthrough (Spheniscine’s MH Walkthrough is my favorite MH guide. I think it is absolutely terrific.)
- tehhowch’s Iceberg guide
- Many Facebook Mousehunt groups have members who are maintaining excellent Iceberg guides that are tailored to the interests and backgrounds of the group. Of particular note are Bill Comeau’s Iceberg guide for the Mousehunt Century Club (I am not unbiased, of course, as Bill and I have collaborated closely on Iceberg research, our guides, etc.) and Jan-Marie Kellow’s Iceberg guide for Mousehunt University.
Visualization, Modeling, Calculators, ...
- (in collaboration with Bill Comeau)
- Chad Moore’s Mousehunt Calculator, Iceberg location
- Paul Humphrey and Tan Yikai’s Mouse Power Values
Sources
Primary
Iceberg News and FB Posts
- The Collapsing Tunnel
- Living Salt
- Iceberg Invasion
- Living Ice
- Iceberg, Dead Ahead!
- Slushball Fight!
- The Shores of Gnawnia Breached!
- An Icy Chill Fills the Air...
Hitgrab Iceberg FB Posts
Iceberg related Feedback Fridays (recordings)
- June 15th Feedback Friday recording
- June 8th Feedback Friday recording
- June 1st Feedback Friday recording
- May 18th Feedback Friday recording
- May 11th Feedback Friday recording
- May the 4th be with you Feedback Friday had connectivity problems so is in two parts:
Iceberg data @ Horntracker
- Nick Alston’s Horntracker (Iceberg)
Secondary
Iceberg related Feedback Friday Reviews
- June 15th MHCC Feedback Friday Review by Jeremiah Macauley
- June 8th MHCC Feedback Friday Review by Jeremiah Macauley
- June 1st MHCC Feedback Friday Review by Jeremiah Macauley
- May 18th MHCC Feedback Friday Review by Jeremiah Macauley
- May 11th MHCC Feedback Friday Review by Jeremiah Macauley
- May the 4th be with you MHCC Feedback Friday Review by Jeremiah Macauley
Iceberg Forum threads
- Deep Freeze base forum crafting thread.
- MH Iceberg Forum thread
Appendix B: Acknowledgments
This guide would not be what it is without Bill Comeau’s ongoing collaboration.
In addition, I would like to thank:
- Adrian Sean Jones, for the advance and pushback data on the Remote Detonator base, the Hearthstone base recipe, and much, much more
- Andrew Blizzard, for bringing the variation in Icewing’s war scrap drop to my attention
- Angie Idlewine, for picking up on Snow Sniper and Living Ice not being in the Iceberg
- Bee Yawn Dee, for the Steam Laser Mk. III recipe, capturing Icewing with the Mk. III, and much, much more
- Charlene Allan, for the Diamond Drill Bits Lexicon entry
- Eric Malbone, for the Steam Laser Mark II recipe
- Jonathan Vong, for Snow Slinger hull fragment and Ice Drill Lexicon entries
- Luis Martell, for finding out what happens when you upgrade your drill mid-run after having used your existing drill the maximum times.
- MKHAS, for the Steam Laser Larry’s Loot Lexicon entries
- Mun Jun Aw, for the Heavy Blaster push back w/Rem Det, among other info
- Ng Zhengrui, for the Magnet Base recipe
- Nick Alston, as always, for Horntracker (what would we do without you?)
- Ryan Quek, for trying Icewing’s Lair with OWN
- Sharon Sbarsky, for pointing out that Living Salt is not in Icewing’s Lair...
- The Mousehunt Boss Mice Crown Challenge, for information gathering on the Iceberg
- Theng-Yoong Png, for confirmation of exact behavior of spiked base
Appendix C: Original Deep Freeze base blueprints
Before being modified, the blueprints for the Deep Freeze base originally read:
The lettering on this blueprint is in an unfamiliar, shifting script that glows with an eerie light. Sometimes you feel you can make out meanings, but never words. There's something on here about un-meltable icebergs, but perhaps that could be turned to your advantage, if only you could figure out how to built it.
Two of the sections of the blueprints seem to refer to advanced power sources, and look familiar.
The next four sections seems[sic] to be talking about construction materials - familiar wires and oils, but a strange mixture of metals.
The next two sections are clearly about binding magic to the base, but the materials referred to are far less clear. Something about magic past its prime, and something about the essence of life itself.
The final section grows fainter as it progresses, ending in a long, downward scrawl and a splotch of ink.