
Working with Adobe Flash Professional you should consider about performance and culture of the content you’re creating.
After some docs reading and co-workers listening, I came to this: I should collect and keep most common and useful “authoring-in-Flash Pro” rules in one place to help with efficient content creating. To make your knowledge of this topic even deeper – consider reading completely all links at the end of this post.
These rules will be useful for the Flash Animators and Flash Designers first of all, developers should know some rules too though.
Completely compatible with Flash Pro CS5.5 and not completely with earlier versions.
– Consider using as low frame rate as possible.
Most animations could be played smoothly enough at 24-30 fps. Graphics, like some application GUI without smooth animations could be played at 12 fps. If you wish to play smooth animation – you could change the fps with code. Using higher fps you’re giving Flash Player Runtime less time to draw, run code, GC. So, if given time will be too short to do all this for one frame, your animation will lose its smoothness.

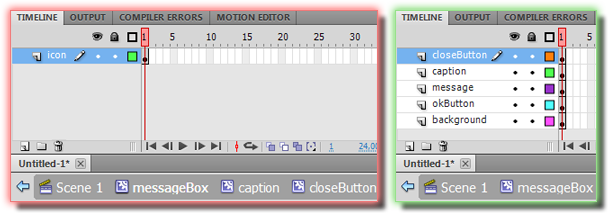
– Avoid nesting when possible.
Use layers instead of containers (MovieClips) when possible. Decreasing amount of nested containers you’re increasing performance.
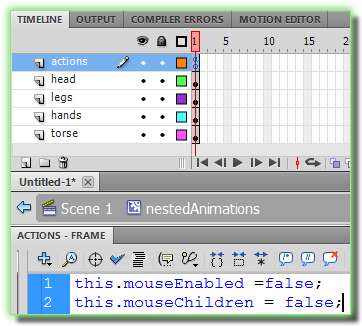
– Deactivate objects with mouseChildren and mouseEnabled.
Write
mouseEnabled = false;

mouseChildren = false;
on the first frame of any non-interactive containers, but only if you’re absolutely sure they never be interactive (and will not contain any interactive objects). This code deactivates container with it and all its nested containers. If you wish to keep current container activated and interactive, use mouseChildren = false; only. Decreasing amount of active containers you’re increasing performance.
– Tune every image in your project’s library.
Carefully tune compression type and quality for every image in the library in Bitmap Properties dialog, especially if images were imported from the PSD, to decrease waste of resources and swf size. Use JPEG for images with many details, gradients, colors, etc. and PNG for simple images to achieve lesser swf size. Avoid using of Allow Smoothing if possible – smoothing takes additional resources. Try to find satisfying trade-off between quality and size. Use Test button to check image size and quality with selected compression settings (check quality on the left dialog’s side and size – in a bottom).
![]()
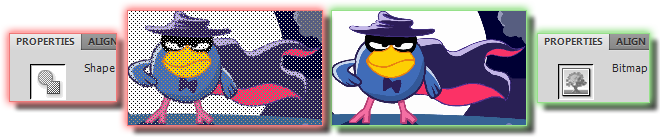
– Fill Shapes with Bitmaps carefully.
This happens when you’re breaking image apart with Modify->Break Apart (CTRL+B) or when you’re choose Color type: Bitmap fill at the Color panel. If you’re use only part of the image to fill with it some Shape, whole image will be compiled into swf file. So, if you’ll use only few small pieces of the large image, whole image size will be added to the resulting swf anyway. You should prepare these small pieces as the separate Bitmaps in this case. Bitmap filling is great if you are going to use the whole image or the most part of it in multiple containers – you’ll gain the opposite result here – swf size will be smaller because only one Bitmap will be compiled into the swf.
– Avoid Bitmaps scaling.
Prepare images to avoid scaling. Scaling up will require additional resources, scaling down will add unused bytes to your swf (if downscaled source image not used somewhere in the project without scaling down).

– Convert outlines to fills.
Use Modify->Shape->Convert Lines To Fills to convert shapes outlines and vector lines to vector fills. Lines require more resources because of 2 sides comparing to only 1 side in the fills.

– Use non-solid line styles sparingly.
Try to avoid dashed, dotted, etc. styles. Solid-style lines require fewer resources.

– Use lines instead of curves when possible.
For example, use miter joins instead of round joins. Lines require less resources comparing to curves. You could use miter joins for the small vector shapes – rounded joins could not be noticeable and could waste resources.

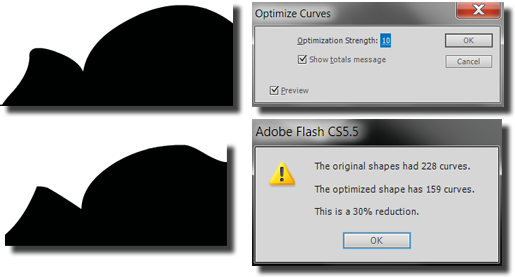
– Optimize vector shapes.
Often vector shapes have a lot of the control points between lines and curves. Removing some of them you could save extra cpu cycles with non-critical visual changes. Use Modify->Shape->Optimize… or Smooth toll to optimize vector graphics. Consider making efficient trade-off between quality and lines count.
– Use vector gradient fills sparingly.
Gradient fills require more resources comparing to plain fills. Try to replace gradient fills with plain fills. Performance boost will be very small, but it will have a place – this could be critical for the projects targeting mobile devices.
![]()
– Use as less alpha as you can.
Alpha noticeably hits performance especially while used in animated objects. Keep an eye on the PNG images – don’t let them have an unused alpha – divide images and crop alpha. Consider to avoid alpha property as well – e.g. use less fading effects.

– Use masks sparingly.
Use masks only when it’s really necessarily. When possible, crop images and vector graphics yourself. Masks require additional resources. Sometimes rectangle mask could be replaced by scrollRect – it could use fewer resources, but could be not suitable depending on mask purpose and other specific things. Just try and compare.
– Use blending sparingly.
Blending hits the performance. Prepare images and graphics considering this to avoid blending using as much as possible.

– Use filters sparingly.
Try to avoid using filters – for example, prepare images with shadows instead of applying shadow filter to that images. Filters could heavy hit the performance.
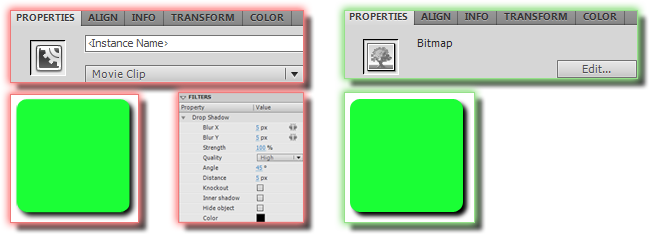
– Avoid animating objects with applied filters (except of movement by x,y).
Objects with filters applied automatically became cacheAsBitmap-applied too. So any animation of these objects (except movement by x,y), like tweening filter(s) properties, tweening transform, tweening color effect – forces Flash Player to re-cache objects on every frame and apply filter(s) to them, which leads to the extremely high resources consumption.
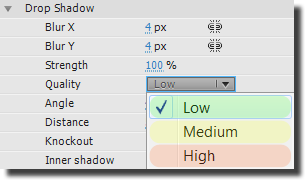
– Use numbers = power of 2 for the blurX and blurY filters properties.
For example – 2,4,8,16 etc. Using such numbers could speedup filter applying up to 20-30%.

– Use only required filter quality.
Don’t use High and Medium quality if Low is enough for your needs. Higher quality – higher resources consumption.
– Use even or power of 2 (this is more suitable) numbers for Bitmaps dimensions if you’re going to downscale that images.
You could allow MipMapping using such numbers for the Bitmaps dimensions. MipMapping wouldn’t work on the cached Bitmaps (so, on the Bitmaps with the filters applied – too). If you’re not going to downscale the Bitmaps or going to use it downscaled only – import them in a correct size.
1024×1024 1280×1280 101×101
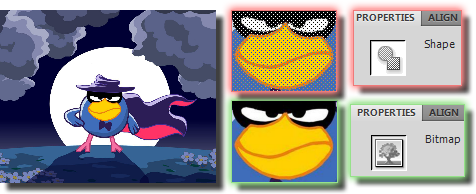
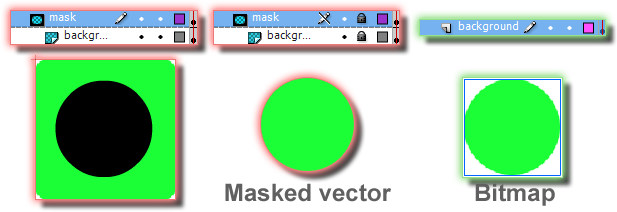
– Use vector for simple graphics.
Use vector for the images with low colors, gradient, details count. Simple graphics requires less resources and less file space in vector. If source image is a Bitmap you could convert it to vector using external tools or Modify->Bitmap->Trace Bitmap…. You should benchmark and compare performance between vector and Bitmap to achieve most efficient results.

– Use Bitmaps for the complicated graphics.
If your graphics contains a lot of gradients, details, colors etc. – Bitmap is a best choice for it. You’re losing lossless scale using Bitmaps, but it’s not so often you’re need it at all. You should benchmark and compare performance between vector and Bitmap to achieve most efficient results.
– Use Convert to Bitmap introduced in CS5.5 carefully.
Convert to Bitmap is a fast and useful way to convert vector\nested objects into single Bitmap. It’s even takes in account some of the nested effects and masks. Though in some cases it could lose some colors or add some extra alpha while converting, so use it carefully – check a resulting Bitmap. If it produces not satisfying Bitmaps for you, consider to use external tools. Also, please note images created using Convert to Bitmap have an Allow smoothing and PNG compression by default.

– Cache complex vector graphic and text. Carefully.
Use cacheAsBitmap for the complex vector graphic without nested animation and static TextFields which not animated any way except of movement by x,y (including animation of the parent containers) only!
You could also use cacheAsBitmapMatrix available in AIR only (since AIR 2.0) to be able scale and rotate cached object without re-caching and to let the GPU make the transformations.
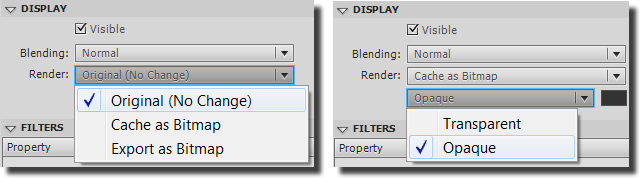
Also you could try Export as Bitmap introduced in CS5.5 to convert complex vector\nested objects to Bitmap while compiling swf. Though, you have no control on smoothing or compression of such images. Use Export as Bitmap only on objects without nested animation. This mode have some advantages over classic cacheAsBitmap – exported image can be rotated, scaled and animated as you want without dramatic performance hit as it would be for cached objects. Exported images added to the swf are increasing file size though.
If cached or exported object have a static color-filled opaque background, you should use the Opaque Bitmap background with a selected color to fill background and to gain even more performance.
If cached container has a lot of unused space between contained objects – make sure to cache each object individually to save extra bytes in memory.
Try different approaches and compare results to reach the best results possible.
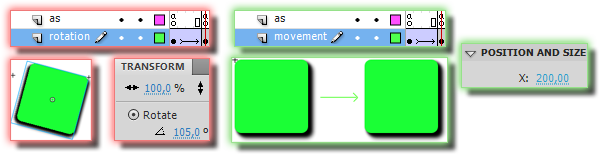
– Remove unused tween animation.

– Avoid using tween animation for simple animation.
Use program approach to make simple animations like movement, rotation, color changing, alpha fading etc. Try third-party libraries like TweenLite. This will make your animation more flexible and resource-saving. Any developer could change such animation easily.

– Avoid frame sequence animation style when possible.
Use tween or program animation instead. It could save some resources and decrease swf size.
![]()
– Avoid using 2.5D in the CPU mode
3d transformed object on CPU will have same performance issues as a bitmapCached object has.

– Use redraw regions
To clearly know what and when is drawing on the stage, you could use “Show redraw regions” in the context menu of the Debug Flash Player.
You could notice invisible animated items, wasting resources using this.

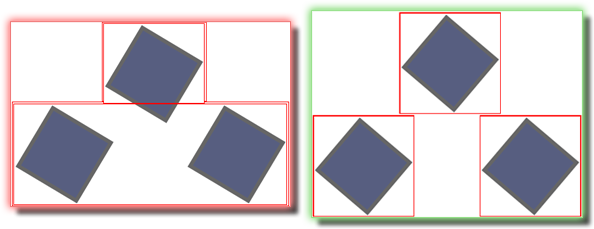
– Try to keep redraw regions as small as possible
Avoid regions overlapping if possible – such regions could be merged in another larger region and more empty space will be touched by redrawing. Smaller regions draw faster.
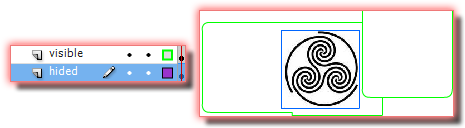
– Disable visible property while setting alpha to 0
If you wish to hide some object, for example before fading it in, you could set its alpha to 0, but you should set the visible property to false too. Visible objects are still clickable and could block underlying items from mouse clicks. Visible objects wastes more resources also.
If you wish to just hide object without fading it out, you should set the visible property to false only, without changing the alpha value.
You could save more resources completely removing objects from the DisplayList (instead of hiding) and adding them on demand (only if hiding\showing is not happens on every frame), but this requires some AS3 and OOP experience to do it well.
![]()
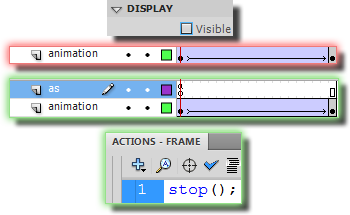
– Stop animations in hidden MovieClips
If MovieClip contains animation played on demand and not on swf start – make sure you’re stopped it.
You should stop animation while hiding or removing MovieClips also.
This will save some resources.
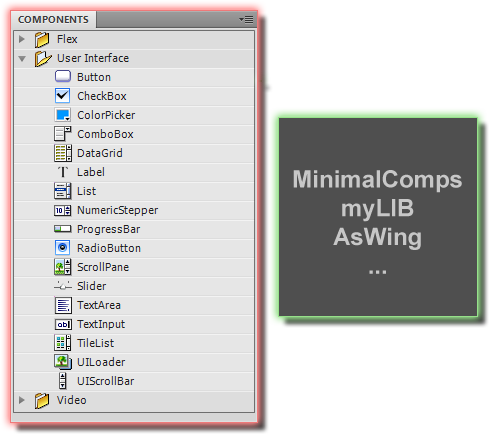
– Avoid using standard UI components.
If you wish to have a list, slider, combo box, etc. – you should use the third-party components or create them yourself. Standard Flash Pro components are slow and buggy, especially for mobile devices.
– Avoid hiding object below other objects.
If you wish to hide object – just set its visible flag to false or remove from the DisplayList. Object hidden below other object still wastes resources.
– Use Size report to search for the items with large file sizes or other bottlenecks of your project.
Check the Generate size report flag at the Publish Settings for Flash to enable.
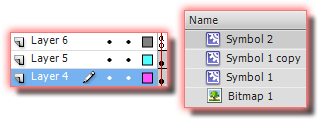
– Use symbols wisely.
If your project has a repeated objects in a different places and maybe in a different colors, feel free to use for it one library symbol with a different Color Effects if you wish.
This will help you to keep swf file size lower.
– Avoid twips (1/20 of pixel).
Try to keep x,y, dimensions of every object rounded to the integer value.
It could help to avoid different aliasing issues and save some resources.

– Don’t place objects off-stage.
Try to not place any objects off the stage. Crop the background, graphics if background will keep its size while swf runs. Do not place whole objects off stage to use it later – consider to ask a developer about that – such objects could be added to the stage at runtime on demand.
Objects placed off-stage still waste resources.
")
– Developers are your friends.
If you have a doubt about animation style, platform features, etc. – you should discuss it with developer(s) in your company, if you have one(s). Sometimes a few code could replace hours of your work!
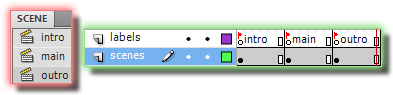
– Keep actions and labels on a separated layers without any assets.
Don’t write your code on layers with assets – such code could be easily missed. Place all code on a separate layer, and all labels – on another separate layer. Both layers should be placed in top of the layers stack on timeline and locked from changes to avoid assets placing.

– Use labels.
Use labels with meaningful names instead of frame indexes. This will help to avoid some issues, as animation length change, and to increase project culture.

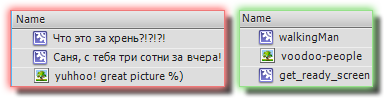
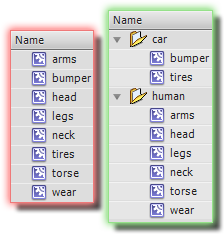
– Give meaningful names to the created elements.
Don’t forget to give meaningful and helping names to the layers, fonts, library items, etc. This is a good manner, could help you and your co-workers in a future and could help developers to track the bugs while debugging.
– Only use letters, numbers, dashes, and underscores in the names.
Do not use spaces, capitalization, or special characters, especially from your native language (if it has not the same letters as at the English alphabet).
It could help you to avoid some issues with version control of other external tools.
– Make all layers same length.
Continue layer adding frames (F5) if it length is shorter than length of the longest layer. This is a good manner and keeps your project clean and neat.

– Do not leave “empty” layers.
Delete layers without any assets, code, labels, sounds, etc. on them.
Keeping them could make further work with the timeline harder.

– Do not create keyframes without changing anything on them.
Keep an eye on the keyframes – remove useless keyframes – keyframes without any changes and not created especially to reinitialize its content.
Such frames will make further work with the timeline harder and could waste resources.

– Avoid using multiple scenes.
Consider to use MovieClips and frames instead.
Scenes can make documents confusing to edit, particularly in multiauthor environments. Scenes often result in large SWF files.
And using multiple scenes is a bad practice at all.
– Use groups. Wisely.
Groups allow to work comfortably and simultaneously with many objects – to align them, for example. Groups do not impact the performance because they are ignored on compile (after compilation only groups content left in the swf, so there is no any new nesting layer or object).
You shouldn’t use groups in case developer could need the access to this group. Use MovieClips in this case instead.

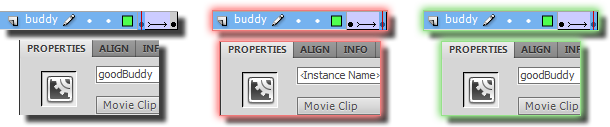
– Use the same Instance name for an animated object on whole timeline.
If you’re filled the Instance name for the tween-animated object on the timeline, make sure you’re filled the same Instance name for all other instances of that object through whole tween animation length on the same layer. It will help to avoid different issues while working with that object from the code.
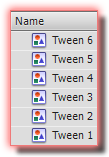
– Convert graphics to MovieClip before animating it with tween animation.
Graphics will be converted into the useless and don’t reachable from code Graphic items automatically if you’ll ignore this rule. If you see items with names like Tween1, Tween2, etc. in your library – it’s already happened.
– Watch for the tween animation integrity.
If tween animation breaks (solid line became dashed) between frames – it means something wrong with the objects on that frames, like there is a different objects count, or objects are not present at one of the frame at all.

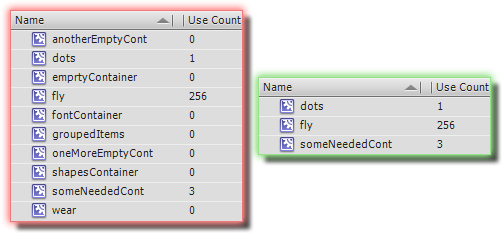
– Remove unused items from library.
Remove all unused items (which are not used now and will not be used in future) to keep your library cleaner and project file smaller. Use column Use count on the library panel and library panel menu item Select unused items (but be careful with this menu item – sometimes it does not work properly).
– Use library folders.
Folders could help to keep your library neat and structured. Working with such library is more pleasant and fast.
– Avoid TLF TextFields using when possible.
Use classic TextFields instead of TLF ones. TLF works slower and adds more bytes to the swf comparing to the classic TextFields and have a bunch of bugs yet. If you wish to use additional features yet and classic TextFields are not suitable for you, consider to try some third-party TLF equivalents like TinyTLF before using TLF. Remember – imported TextFields are TLF. Don’t forget to make them classic if TLF is not needed.
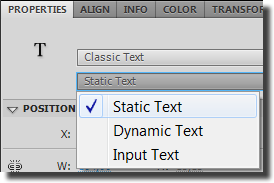
– Choose TextField text type wisely.
Wisely choose a TextField text type depending on the TextField purpose while importing or creating texts. Setup your TextField as Static text if it is not considered to be editable by the user or by the code. Setup it as Dynamic Text if you need it to be editable by the code. Chose Input text to make it both editable by user and the code.
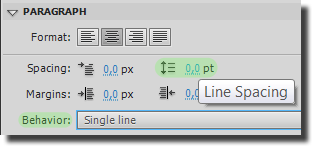
– Keep all TextField properties neat.
Some default values of TextField properties are redundant. Like line spacing – 2 and Behavior – Multiline. But if you’re creating single line TextField you should set these properties to 0 and Single line accordingly.
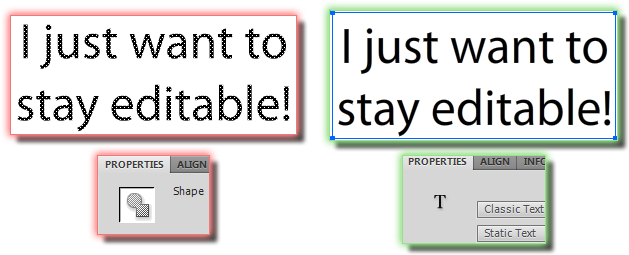
– Don’t break TextFields apart.
Text became not editable after breaking apart. If you wish to break text apart to animate letters you should ask a coder first because there are some ways to animate letters by code keeping TextField editable.
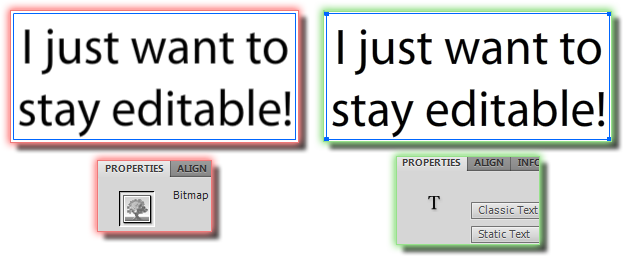
– Don’t use Bitmaps for text.
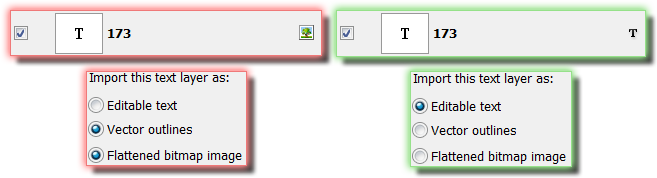
Text in the Bitmaps can’t be so easily edited as in the TextFields. Don’t use Flattened bitmap image text import mode – use Editable text instead.
If you’re using Bitmaps for text for the performance reasons, consider to use TextFields in containers with cacheAsBitmap or Export as bitmap (better with opaque background) properties enabled instead of keeping text in the Bitmaps.
– Import TextFields properly.
Always import TextFields as Editable text.
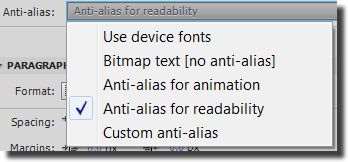
– Use Font rendering method Anti-alias for animation sparingly.
Try to use Font rendering method Anti-alias for readability for the non-animated TextFields. Anti-alias for animation makes fonts not so smooth as Anti-alias for readability.
– Keep static TextFields sized to the content.
You shouldn’t create a static TextFields with dimensions bigger than text dimensions. Except of TextFields used to show the Button labels or something like that – because labels usually should be centered and in this case TextFields should have the Button’s width and text should be aligned to the center to make text editing easier.
To set the TextField dimensions equal to text dimensions click on the white square in the top right corner of the TextField while editing text. If there is a circle instead of square – dimensions are equal already.

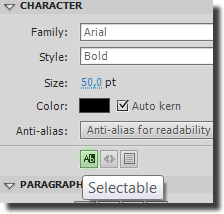
– Keep an eye on the TextFields Selectable property.
Don’t forget to disable this property on the TextFields if it is not needed. It is enabled by default. Keep it enabled only when needed, for example, on the TextFields for error messages.
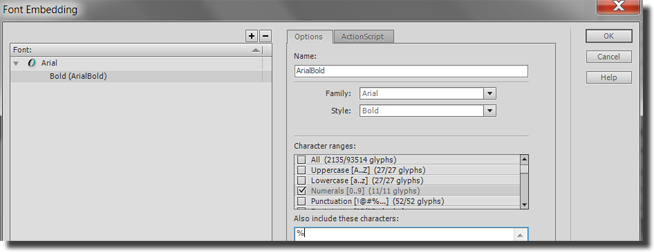
– Embed fonts chars used in the dynamic/input/TLF TextFields.
Embed only needed chars to avoid adding extra bytes to the swf. Use Text->Font Embedding… for chars embedding. Name embedded fonts meaningful.
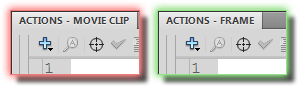
– Avoid attaching code to Buttons and MovieClips (ActionScript 2).
If you’re working with a project for the ActionScript 2 – avoid attaching the code – write it on the frames, inside of objects because attached code could be hard to find and support.
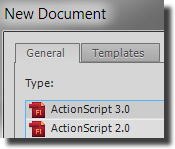
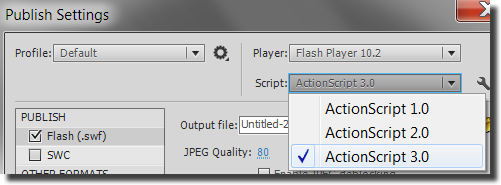
– Target right ActionScript.
If project will be coded in ActionScript 3, you should write your animation code in as3 too. It will help to avoid time wasting.
– Send all font files with a project.
Always keep font files within your project folder and send them together if you share the project with co-workers. It will save your time and the time of your team.
– Send all used in project libraries and third-party classes with project.
And don’t forget to attach all libraries and classes you’re using through global paths!
– Keep all important code in one place and not important – in the target places.
If you prefer to write code on frames – try to keep all important (as stage resize handling, stage setup, etc.) code which could be changed in a future in one place, for example, in the first frame to provide easy way of moving this code into the external class on demand.
Place unimportant, isolated or supplemental code into target objects controlled by this code.
– Don’t include unused XMP metadata.
Disable Include XMP metadata in the Publish Settings for Flash if you do not use XMP metadata. This will make a swf few bytes smaller.

– Take care of the publish speed.
If you’re about to use en external library – consider to use it as swc instead of bunch as files (some developers publish their libraries both as swc and bunch of as files).
Use and configure Publish Cache (introduced in CS5.5) for your hardware. Publish Cache settings are placed here: Edit->Preferences->Publish Cache.
If your project has a lot of ActionScript 3 code and compiling goes too slow, consider to disable Warnings mode for ActionScript 3 at Publish Settings for Flash -> Advanced ActionScript 3.0 Settings to make compile process faster. You’re losing some useful code tips disabling warnings though.

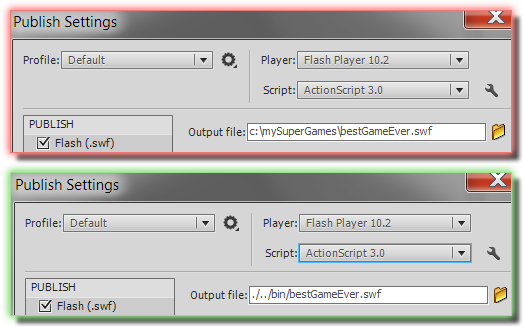
– Avoid using direct paths. Use relative ones instead.
Use relative paths to classes, libraries, output files, etc. It will make your project portable and simple to transfer. Your co-workers wouldn’t waste their time changing the paths.
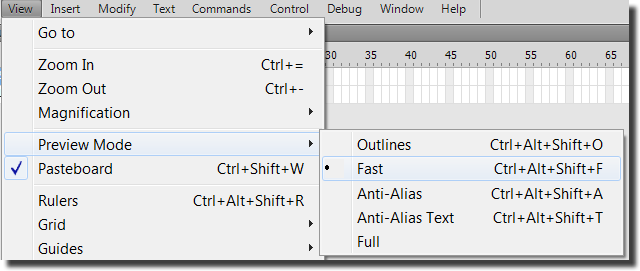
– Use appropriate Preview Mode.
Remember you could change the document rendering quality to speed up its display. Choose most appropriate mode at View->Preview Mode->…
You could make a high quality and neat Flash Pro projects both for desktop and mobile considering all these rules.
Your co-workers are going to be happy working with such projects.
Now I’m working on the XFLTool project which contains module checking XFL project for following some of these rules. It is now in the early alpha, but I am still working on it. Keep your heads up!)
If you’re using some other rules in your work, I’ll be happy to know about them and will add most important and motivated to this list. So feel free to send me your comments, opinions, criticism, rules and anything you want.
Used information sources:
-Adobe docs
Optimizing Performance for the Flash Platform
Best practices
– Article in russian “Работа с FLA”
– Article in russian “О fla-исходниках”
Thanks to Artemy Malkov (translation hints and typos reports).
Thank you for your attention.
Found a typo? Please, highlight it and press Shift + Enter or click here to inform me!

Pingback: Performance Tipps ? - Flashforum
Nice, thx for sharing 🙂