Big pictures in your Storyline course can REFUSE to shrink. Here’s a fix…
The problem
For learners on mobiles (or in remote areas), big pictures in your Storyline course can really slow it down, making it painful to use. (Or even useless to them!)
So, to avoid that, your LMS team might have a size limit on SCORM files they’ll accept onto the system.
Recently, I came across that problem – on more than one project. But, thanks to the Articulate community, I found a neat fix…
The cause
When you publish, Storyline saves your cropped pictures as PNG files – even if they should be JPEGs. (And PNGs are often up to 10× bigger.)
In essence, this tip involves discarding cropped areas from your biggest pictures. For some reason, that keeps them as JPGs in your SCORM file.
The diagnosis – to check if you have this problem
- Go to your course’s Storyline output folder in Windows.
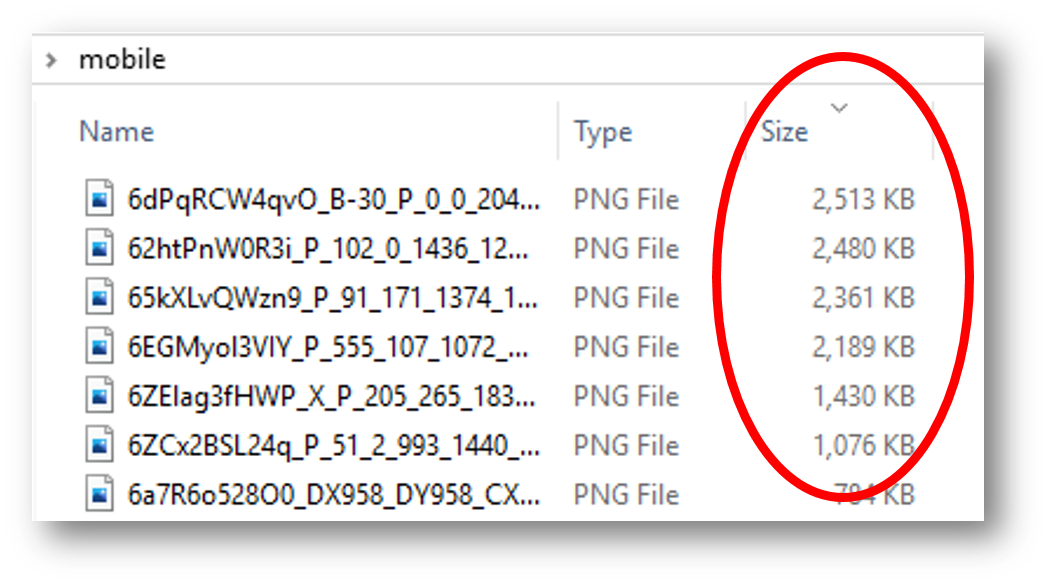
- Open the Mobile folder.
- Sort by file size. (Choose View > Details, then click the Size column heading.) Chances are, some PNGs will be among the biggest files.
- Preview a few big PNGs to see which pictures they are. (View > Preview pane)
The workaround
Here’s the fix in brief:
a. Back up your .story file.
b. Save your biggest pictures as cropped JPEGs.
c. Replace the originals on your slides.
And here’s the fix in full:
- Back up your .story file (so you can adjust the cropping later if needed).
- In Storyline, choose View > Media Library > Images. (You can sort by size, too).
- In Media Library, click the biggest picture you previewed in Windows.
- To go to the relevant slide, choose Jump to location. (It’s the button with a “magnifying glass on a page” icon.)
- Copy the offending picture from your slide (rather than from Media Library). If you want, drag Media Library out of the way – but keep it open (for speed).
- In your preferred* photo editor, paste the picture. (It’ll appear cropped and sized like it is on your slide.)
- From that app, save the picture as a JPEG file.
- On your slide, right-click the picture and choose Replace Picture > Picture from File, then replace it with the JPEG file.
- Using the next biggest PNG file you found, return to step 3 in this section...
(* In step 6, you could use Photoshop. Or, for speed and simplicity, you might prefer to use Paint – like me. Each to their own!)
The result
Now, when you publish, the pictures you replaced will stay as JPEGs in the output. (It’s like magic †)
For instance, in the screenshot at the top of this post, you could shave about 10 MB off the size of the SCORM file, just by replacing the 6 biggest PNGs with JPEGs.
Might your peers find this tip helpful?
Please share it.
Had this problem yourself? How did you work around it?
Feel free to raise any queries or suggestions you have about this tip, too...
P.S. Thanks to Mark Lentz for sharing here (in the Articulate community) his outline of this tip, which is how I fixed the projects I mentioned at the start.
† If you follow that link, you might see the discussion dates back over 3 years. It’s a real shame when Articulate don’t fix these things!